Showing posts with label COMPUTER. Show all posts

How To Show Hidden Files & Folders in USB Drive / Pendrive (Virus Removal)

Have you wondered where your files have gone from your USB Drive without deleting them? Are you searching for your files saved on your Pendrive? Well, if you are facing the same problem, you are in a big trouble. Your USB Drive or Pendrive got affected by virus. Basically, this thing happened only due to viruses. USB Drives are the very first thing to spread viruses from one PC to the another. Just because of that, you won’t be able to view your saved files and folders from your Pendrives and USB Drives. To get all of your files back, you have to get rid of that virus. If you got stuck with the same problem, you have to follow the below given tutorial. How to show hidden files & folders in USB Drive, is very well explained in the following tutorial. Useful details are as follows!
Remove virus from Pendrive
Basically there are plenty of ways to see hidden files and folders from your USB Drive, however, your Pendrive got affected by Virus and for that you have to remove that particular virus from your pendrive to see your saved files and folders, which are being hidden by Virus. To remove this virus and see all of your files, you just need to follow the below steps.

How To Show Hidden Files & Folders in USB Drive / Pendrive (Virus Removal)

Step 1 :
The very first thing you need to do is insert your Pendrive or USB Drive into a USB port of your PC.
Step 2 :
Once your device get recognised, go to My Computer and see the assigned letter to your Pendrive. It could either be F drive or E Drive or something else, you have to remember it for a while.
Step 3 :
Now, open Command Prompt Window of your PC. To do so, go to your Start Menu and hit the Run option. In run box, enter cmd and hit the enter button. This way you can get the command prompt window displayed on your screen.
Step 4 : 
After this, you should see a cursor on your Command Prompt to enter our text. Here you have to enter the Pendrive’s drive letter. If your USB Drive is showed as drive J enter J and hit the enter button.
Step 5 :
After this, you have to manually type in the folder or file’s name is being missed or hidden. You have to navigate to that particular file or folder. If you don’t know the exact way of doing this, type in CD in capital letters and hit the enter button. There you can see a list of all the files from which you have to select the missing files.
Step 6 :
For example if a folder named tekplz is being missed from the drive, you have to type in the following command into the command prompt window. Make sure to type the exact letters including all the given actions.
attrib “tekplz” – h
After typing the above command, hit the Enter button.
Step 7 :
You’re done! You have successfully removed the actual virus from your USB Drive. You can get the access of that particular file or folder which was missed from your drive. To do so, follow the below path.
My Computer>> Go to your USB Drive>> Click on to the Drive>> tekplz
See, this is how you actually can get all of your hidden files and folders from your USB Drive. If you are from a non tech background, you can ask for any technical person’s help who can follow the above given steps from your Windows PC.
The next way to unhide manually hidden files is from your own Windows PC. Windows allows you to hide particular files and folders from your drive so that no once can see those files and folders easily. If you don’t know the way of unhide or hiding the files, follow the below path.
Go to Organize option, which can be found under the address bar and then click on to the View option. You would see a new Window with a number of different options. There you would have two different options with radio button. Here you can select a proper button whether to hide the files or to unhide them. You can easily make changes to the files right from here instantly!
What’s your take? Did you find it a helpful tutorial? Do let us know your views and opinions on the above tutorial. If you know any other way to see hidden files or to remove virus from Pendrive, do share your thoughts and experiences with us. Meanwhile, if you have any other questions or queries or any doubts, kindly put your words as a comment below the comment section. We would like to interact with you regarding the tutorial. Your feedback and suggestions are always welcomed!

How to Eject USB Flash Drives in Mac OS X

Apple is not just a brand name, it’s like a dream of Millions of people out there. When there’s Apple, there’s everything. If you are someone who related directly or indirectly with technology, must be aware about Apple and its product. When it comes to a Computer, there appears two names, a Windows PC and a Mac system. I’m pretty much sure that you are here to see something useful for your Mac system which indirectly indicates that you are a newbie who just owned a Mac system. Am I right that way? Well, here we are running a series on Mac’s tutorial to guide you well on Mac and its uses. Today we came up with a turorial on, how to eject USB Flash drives in Mac OS X instantly without getting messed. If you don’t know how to safely remove a device from your USB port, this tutorial could help you out instantly.

Eject USB Safely

Mac is known for its simple and on the go services. Unlike the Windows PC, here in Mac you can get all of your basic things done without messing up with many things. You can easily do all the tasks right from your Trackpad, you just need to swipe your finger on to the trackpad and you’re done! To know how to remove USB Drive safely on a Mac system, you just need to follow the below given simple steps. These steps are very simple and anyone, even if you just owned a Mac system, can make use of this trick right away. Before talking further, let’s get on to the tutorial directly and see the process right away!

How to Eject USB Flash Drives in Mac OS X

Step 1 :
Scroll your finger down on the Trackpad and the Dock will be presented to your Desktop along with all the useful option. As you know to bring your Macintosh’s hard drive on the screen, you need to open the Finder of your Mac. Click on to the Finder icon from the Dock.

Step 2 :
Finder will get you all the information about your Mac’s hard drive. It will show you everything installed on your Mac system including all the apps, downloaded files and pretty much everything on the go. If you have attached a USB Flash Drive to your Mac, it will show you the name of that particular USB device under the Devices options. Devices option will show you all the externally attached USB Flash Drives into the same list.
Step 3 :
Click on to the right side of the USB Device’s name and it will show you a number of options. Eject option is right there, click on to that option and USB Device will be removed safely from your Mac.
Step 4 :
If you find it a bit annoying, there’s one more trick to get rid of this annoying need of yours. Just click on to the USB Device’s name and drag it down into the Trash option into your Dock. Simple as that. This way your USB Device will safely be removed.

Top 11 Free Online Video Converters

Top 10 Best Free Online Video Converters – Have a look at this ultimate list of the best free online video conversion tools to convert your videos from one format to another online for free: We often need to convert a video file for the sake of compatibility on various platforms / devices. Online video conversion offers significant advantages over any desktop app. As a cloud based service, it could be used anywhere and on many different platforms without the need to download or install anything. If you’re on the move, an online video converter serves your  needs perfectly.
I compiled a list of the best free online video converters on the web. These consist of both PC and Mobile oriented sites. Ease-of-use, learning curve and portability were taken into consideration.
This is the start of a series of web tools I will be doing in the coming days. I love web tools as they offer the utility of desktop apps with the reliability of the cloud and flexibility of platforms combined with the advantage of portability. You know something’s awesome when it has so many associated nouns that end in ‘-ity‘. Let’s roll

Best Free Online Video Converters


Cloud Convert :

Cloud convert, as the name suggests, brings the power of the cloud to your video conversion process. It offers options to upload files from Dropbox and Google Drive and the ability to send your converted files to the same upon completion. You can also opt to receive an email notification once your conversion is done. It’s list of services is quite extensive with support for Video, Audio, Cad files, Spreadsheets, Presentations, E-books and Documents.
Cloud Convert


Online Convert :

Online-Convert.com is one of the most comprehensive online media converter on the web. The site hosts not just video converters but also audio,document,image,archive and e-book converters. It also has a hash generator. Upload a file from your desktop or any site (direct link), select output format and quality and convert it with ease. It gives you a download link in mere seconds after upload. Highly Recommended.
Online-Convert


Media Converter :

Media Converter is a simple online video converter where you’re presented with a window to upload your file and convert it into desired format. However, you only get 5 free conversions per day. Output formats include WMV, AVI, MP4, OGG etc.

N°1 Free online Video Converter :

N1 Online video converter greets you with a homepage that asks you to select your region so as to provide a server closer to your location. You can convert videos from Youtube or upload files from your own PC (Video & Audio) to be converted. Click ‘Save as’ once finished. It is simple and free and the whole process takes just a few minutes.

Wap 4 :

Wap4 is an open-source online video converter site that specializes in mobile video formats. Max upload files size is 100MB. Upload. Convert. Save to PC instantly. Simple.

Files Conversion :

Files-conversion.com maybe the simplest online video converter yet. It offers options to set quality from low to very high and the ability to change video size. Converted files can be instantly saved to PC.

File Wiggler :

File Wiggler is another free online media converter that supports a large variety of formats. You can upload videos upto 200MB in size. If you refer 5 people you can upload upto 400MB of videos. The only gripe here is the conversion is not instant and links will be E-mailed to you in about 3 days after upload.
File Wiggler


You Convert It :

You Convert it offers free online video conversion in a simple one page setup. Just upload files from your computer and the converted files will be E-mailed to you upon completion. Supports 3GP, MOV, AVI, WMV, SWF etc.
Also check this out: Best 3GP & MP4 Video Converters for Free Download

Convert Videos Online :

Convert-video-online.com offers a clean, simple interface where you uplaod a file from your PC and convert it instantly with zero hassles. It offers HD formats to convert your files to and the conversion process itself is blazing fast and the download link is presented immediately.
Online Video Converter


MakeJar :

MakeJar is another site that specializes in mobile phone video formats. The output formats are given in the form of profiles i.e a list of phones is available from which you can select your phone to start converting your video. You can save the file to PC post conversion. HTC, Nokia and some Samsung models are presently listed on the site.
MakeJar

Convert Files :

It’s a free  online converter capable of processing files up to 250 MB in size. You can upload from your PC or a URL (direct link). You can also upload videos from popular video sharing sites like Youtube, Metacafe etc. The conversion support is extensive ranging from Videos to Archives and even Drawings.

Conclusion : To wrap things up, Online video conversion simply rocks and you should definitely give it a spin if you haven’t  used it yet. Choose a site from above that best suits your conversion needs. After all, why bother downloading an app and straining your PC when you can leave all the heavy-lifting to a cloud based service. The server does the grunt work while you get to download & enjoy your converted files in the desired format for free.
You might also love to check out this list of the: Best Video Converters for Windows & Mac OS X

Download for PC

how to disable right click on blogger blog

how to disable right click on blogger blog

Disable right click function on blog is one of the best way to protect your blog content from content thieves.
Even Thieves couldn't save images in your blog.They will be displayed a status message that this function is disabled in this blog .You can customize the status message according to you.

Actually this script is free and very popular among website masters.

Lets  Start:

  1. Sign In to Blogger account and go to relevant blog.
  2. Go to  Edit HTML though  Design .
  3. Now Search fr Below Code.
  4. </head>
  5. Now Copy down the below code and Paste it before the Above code.
  6. <!--Disable Copy And Paste--> <script language='JavaScript1.2'> function disableselect(e){ return false } function reEnable(){ return true } document.onselectstart=new Function ("return false") if (window.sidebar){ document.onmousedown=disableselect document.onclick=reEnable } </script>
  7. Save the Template ,And  refresh your Blog and Right Click on it. Done!

Secure Your Email Address On Blog


Do you receiving frequent messages from any websites that you never visited or subscribed ?

When ever you provide your email address in your blogger post, or comment box ,Google Bots would index it into search Results,Spammers would catch these email address and add to their contact list.So they can begins to message you at a click !

But When ever a Reader asks us to give your email address where he can contact you through email.!At this instant you should share it.! But spam Bots are around you.
Here I Listed two Methods to Solve this Problems.

But how can you prevent from these spammers. ?

#1 - Most Secured Email Hiding Method
#2 - Widely Used secured one!

  1. Google Recaptcha mail hide can Hide your Email  address partially in your Blog posts, comment box.!
  2. hap1...@gmail.com
  3. Provide Email address in your Blog Post/comment Box by hiding  @ sign,Instead Write this sign as  [at]
           Example : hap12310[at]gmail[.]com

When ever a reader click on Recaptcha he must solve the Word verification ,so Robots couldn't catch it for spamming.!

Top 5 Google Chrome Apps For Bloggers Must Check


Are you using a chrome browser for blogging  ? If yes then why can't you add Chrome apps which would make your blogging more fast,easy and fun. Here on this post i would like to share some top chrome apps that a blogger must have .

         A blogger must check out this awesome app which is the easiest way to update your blog .It is a full featured blog editor that integrated with your browser.You can create new posts,labels and even edit old blogs posts.It have simple and clean interface and more tools available.Both compose mode and HTML mode is enabled.
One highlisht is No need of Registration.

This app helps you to check how your blog views in various resolution .It resize entire browser to desktop,netbook,mobile and more resolution. This helps you to develop your blogger template .

 Best tool for web development.Allows inspect,edit and monitor CSS ,HTML codes, even if you don't know these languages.Found any white spaces in your blog ? You can fix with Firebug.Firebug can be used to reduce space in your blog.

This is one of the top chrome app for edit images which is layer base one.Pixlr is browser integrated app.No need of download,registeration, simple interface and not at all annoying.The editor is capable to reproduce PSD files.

It create screen shots of web pages , edit or annotate them and save into youcomputer at any formats.You can even export ito blogger ,email it and print out it.
Simple and Clean interface.

How To Add Twitter Timeline Widgets On Blog

Twitter is more conscious about twitter widgets and tweet buttons for websites and blogs.As part of this  twitter developed more features on their widgets.Earlier times,there had only Tweets widgets which displays your tweets. Today morning,twitter introduced new widgets for favorite tweets,List tweets and Hash tag search.
And you can publish any users timeline tweets (public) on your websites.

How To Add this Widget on your Blog ?

  • Go to Widgets settings on your twitter account. (https://twitter.com/settings/widgets) .
  • Click on 'Create new" button on right side  of the particular page.
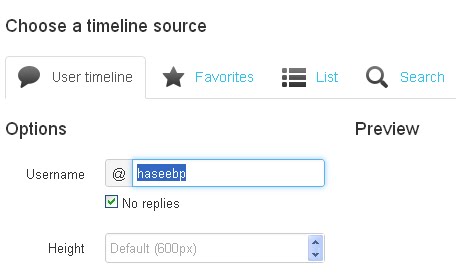
  • Choose your  Timeline source, and scroll down your page and click on 'Create Widget' button.
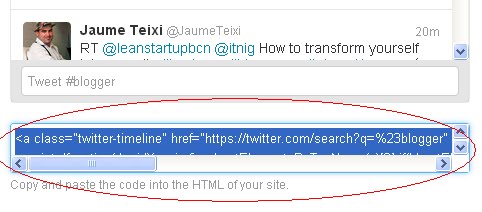
  • Copy down the Code and Paste in HTML/Java script Box in your Blog.
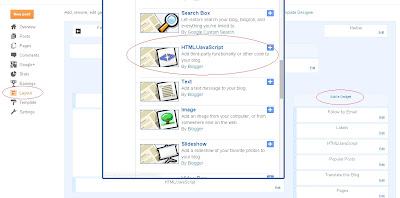
  • Now Go to Blogger.com --> Layout --> Click on 'Add a Gadget'  --> and Choose HTML/Javascript widget from the list.
  • Paste this code and Save. Refresh your blog and see your tweets on your blog.

Technology Updates!

Imagine wrapping paper that could be a gift in and of itself because it lights up with words like "Happy Birthday." That is one potential application of a new biodegradable battery made of cellulose, the stuff of paper.

Scientists worldwide are striving to develop thin, flexible, lightweight, inexpensive, environmentally friendly batteries made entirely from nonmetal parts. Among the most promising materials for these batteries are conducting polymers.

However, until now these have impractical for use in batteries — for instance, their ability to hold a charge often degrades over use.

Easy to make

The key to this new battery turned out to be an often bothersome green algae known as Cladophora. Rotting heaps of this hairlike freshwater plant throughout the world can lead to unsightly, foul-smelling beaches.

This algae makes an unusual kind of cellulose typified by a very large surface area, 100 times that of the cellulose found in paper. This allowed researchers to dramatically increase the amount of conducting polymer available for use in the new device, enabling it to better recharge, hold and discharge electricity.

"We have long hoped to find some sort of constructive use for the material from algae blooms and have now been shown this to be possible," said researcher Maria Strømme, a nanotechnologist at Uppsala University in Sweden. "This creates new possibilities for large-scale production of environmentally friendly, cost-effective, lightweight energy storage systems."

The new batteries consisted of extremely thin layers of conducting polymer just 40 to 50 nanometers or billionths of a meter wide coating algae cellulose fibers only 20 to 30 nanometers wide that were collected into paper sheets.

"They're very easy to make," Strømme said.

Quick to charge

They could hold 50 to 200 percent more charge than similar conducting polymer batteries, and once better optimized, they might even be competitive with commercial lithium batteries, the researchers noted. They also recharged much faster than conventional rechargeable batteries — while a regular battery takes at least an hour to recharge, the new batteries could recharge in anywhere from eight minutes to just 11 seconds.

The new battery also showed a dramatic boost in the ability to hold a charge over use. While a comparable polymer battery showed a 50 percent drop in the amount of charge it could hold after 60 cycles of discharging and recharging, the new battery showed just a 6 percent loss through 100 charging cycles.

"When you have thick polymer layers, it's hard to get all the material to recharge properly, and it turns into an insulator, so you lose capacity," said researcher Gustav Nyström, an electrochemist at Uppsala University. "When you have thin layers, you can get it fully discharged and recharged."

Flexible electronics

The researchers suggest their batteries appear well-suited for applications involving flexible electronics, such as clothing and packaging.

"We're not focused on replacing lithium ion batteries — we want to find new applications where batteries are not used today," Strømme told LiveScience. "What if you could put batteries inside wallpaper to charge sensors in your home? If you could put this into clothes, can you couple that with detectors to analyze sweat from your body to tell if there's anything wrong?"

Future directions of research include seeing how much charge these batteries lose over time, a problem with polymer batteries and all batteries in general. They also want to see how much they can scale up these batteries, "see if we can make them much, much larger," Strømme said.

The scientists detailed their last month in the journal Nano Letters.

How To Deface A Website With Basic HTML Coding In Just 5 Minute

I was browsing the net when i saw this tutorial:

Source: http://naijadudes.com


Steps:

Open the site you want to hack. Provide wrong username/password combination in its log in form. (e.g. : Username : me and Password: ' or 1=1 --)An error will occur saying wrong username-password. Now be prepared your experiment starts from here.


Right click anywhere on that error page =>> go to view source.

3. There you can see the HTML coding with JavaScript.• There you find somewhat like this....<_form action="...Login....">• Before this login information copy the URL of the site in which you are. (e.g. :"< _form..........action=http://www.targetwebsite.com/login.......>")

4. Then delete the JavaScript from the above that validates your information in the server.(Do this very carefully, your success to hack the site depends upon this i.e. how efficiently you delete the java scripts that validate your account information)

5.Then take a close look for "<_input name="password" type="password">"[without quotes] -> replace "<_type=text> “there instead of "<_type=password>". See there if maximum length of password is less than 11 then increase it to 11 (e.g. : if then write )

6. Just go to file => save as and save it anywhere in your hard disk with ext.html(e.g.: c:\chan.html)

7. Reopen your target web page by double clicking 'chan.html' file that you saved in your hard disk earlier.• You see that some changes in current page as compared to original One. Don't worry.

8. Provide any username [e.g.: hacker] and password [e.g.:' or 1=1 --] You have successfully cracked the above website and entered into the account of List user saved in the server's database.

Warnings

Do the coding and changes very carefully, your success to hack the site depends upon this i.e. how efficiently you delete the java scripts that validate your account information.

Please like this post if it worked for you

Hiding RATs,Trojans and Keyloggers from Antivirus.

Recently , Zain posted how to make a pro rat server to hack victims computer in order to get all the saved passwords, related to Facebook, Twitter, and many others. Also you may get the screen shots of the infected computer. Today, I am telling you how to hide such severs, Torjans and RATs also keyloggers from Antivirus since all are of same kind. Here, we shall use a simple software, also hex editing can be done to make this possible, Later i will post about Hex editing also, Don't worry hackersthirst will be complete guide for those beginners who want to learn such things for getting more secure.

This program is used by programmers and other experts to make there softwares secure from crackers and hackers, We shall use this to make our trojans, Servers, Keyloggers and much more secure in order to hide them from antivirus.
Steps:
1) First of all download this software from here.

2) After downloading the application, install it and then run it. After running load your any application or trojan which you want to hide from antivirus like this:
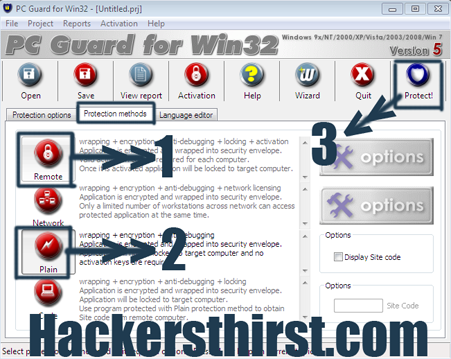
3) Select the following options, Like i did below:
4) Now, Select following options and protect your server or trojan.

You are done, You will see that an old and new file is created in that same folder, Like below, I have tested this for Pro-Rat.
Checking With Antivirus:
So, Now lets scan with an updated antivirus:

You may check it with other antivirus, I have scanned using an updated antivirus (Eset as you can see).

Note: You can also use Cyber-gate instead of pro-rat. Also, This trick doesn't work for all Keyloggers and RATs. - See more at: http://www.hackersthirst.com/2011/03/hiding-ratstrojans-and-keyloggers-from.html#sthash.9J0o2SJa.dpuf

10 Fast and Free Security Enhancements


Before you spend a dime on security, there are many precautions you can take that will protect you against the most common threats.

1. Check Windows Update and Office Update regularly (_http://office.microsoft.com/productupdates); have your Office CD ready. Windows Me, 2000, and XP users can configure automatic updates. Click on the Automatic Updates tab in the System control panel and choose the appropriate options.

2. Install a personal firewall. Both SyGate (_www.sygate.com) and ZoneAlarm (_www.zonelabs.com) offer free versions.


3. Install a free spyware blocker. Our Editors' Choice ("Spyware," April 22) was SpyBot Search & Destroy (_http://security.kolla.de). SpyBot is also paranoid and ruthless in hunting out tracking cookies.

4. Block pop-up spam messages in Windows NT, 2000, or XP by disabling the Windows Messenger service (this is unrelated to the instant messaging program). Open Control Panel | Administrative Tools | Services and you'll see Messenger. Right-click and go to Properties. Set Start-up Type to Disabled and press the Stop button. Bye-bye, spam pop-ups! Any good firewall will also stop them.

5. Use strong passwords and change them periodically. Passwords should have at least seven characters; use letters and numbers and have at least one symbol. A decent example would be f8izKro@l. This will make it much harder for anyone to gain access to your accounts.

6. If you're using Outlook or Outlook Express, use the current version or one with the Outlook Security Update installed. The update and current versions patch numerous vulnerabilities.

7. Buy antivirus software and keep it up to date. If you're not willing to pay, try Grisoft AVG Free Edition (Grisoft Inc., w*w.grisoft.com). And doublecheck your AV with the free, online-only scanners available at w*w.pandasoftware.com/activescan and _http://housecall.trendmicro.com.

8. If you have a wireless network, turn on the security features: Use MAC filtering, turn off SSID broadcast, and even use WEP with the biggest key you can get. For more, check out our wireless section or see the expanded coverage in Your Unwired World in our next issue.

9. Join a respectable e-mail security list, such as the one found at our own Security Supersite at _http://security.ziffdavis.com, so that you learn about emerging threats quickly and can take proper precautions.

10. Be skeptical of things on the Internet. Don't assume that e-mail "From:" a particular person is actually from that person until you have further reason to believe it's that person. Don't assume that an attachment is what it says it is. Don't give out your password to anyone, even if that person claims to be from "support."

বাংলালায়ংন কাস্টমার কেয়ারে অভিযোগ করতে গিয়ে গালাগাল ও শারিরীক হয়রানির শিকার


আসসালামুলাইকুম আমি আপনাদের বাংলালায়ংন  কাস্টমার কেয়ারে অভিযোগ করতে গিয়ে গালাগাল ও শারিরীক হয়রানির শিকার  হওয়ার ঘটনা শেয়ার করতে  চাই।আমি গত ২০/০৬/২০১৩ তে আমার ইউজার আইডি bclbg.80458 এ 300 কেবি স্পিড এর king (1100
টাকা details)প্যাকেজটা নিই {আগ্রাবাদ,চোমুহনী,চট্রগ্রাম থেকে }আমার আগের প্যাকেজ ছিল সাফারি king 500 kbps স্পিডের প্যাকেজ[ details ]
আমি প্যাকেজ পরিবর্তন করে 300 কেবি স্পিড এর king প্যাকেজটা নিই।আমার বিলের ছবি দেখুন ।
ওখানে আপনারা দেখেন যিনি টাকা নিছে ওনার সাইন সহ আছে।কিন্তু ০৫/০৭/২০১৩ তারিখে ১৫  দিন পর আমার লাইন বন্ধ করে দেওয়া হল।কাস্টমার কেয়ারে কল করে যান্তে পারলাম আমার নাকি ৬১৪ টাকা বাকি আছে।এই দেখেন ছবি ।
কিন্তু আমিত সব টাকা দিয়ে দিয়েছি যার প্রমাণ ছবিতে আছে।আমি যখন কাস্টমার কেয়ারের লোকের [জাহিদ নামের লোক আগ্রাবাদ,চোমুহনী,চট্রগ্রাম তে  চাকরি করে বাংলালাংয়ন আফিসে ]কাছে গেলাম ওনাকে বোঝাই বললাম, ওনি কিছু বুঝতে চাইলেন না। ওনি বললেন কম্পিউটার এ যা লিখা আছে তা। আমি ওনাকে বললাম মানে কি, কম্পিউটার এ কি লিখছেন তা আপনি যানেন । আমি ত দেখছি আপনি বিলের কাগজে টিকি লিখছেন যে আমি টাকা দিছি এবং আপনি বলেছেন কোন সম্যসা ছাড়া সব টিক হয়ে যাবে, আপনার সাইনও রয়েছে।আপনিত বলেছিলেন আমাকে সব টিক আছে বিল নেওয়ার সময়।হটাৎ আনেক্ষন কথা বলার পর ,উনি আমকে তুই তাই করে কথা বলতে শুরু করলো এবং আরও বল্লযে যা বেটা মডেমটা পেলায় দে এবং মারমূখী হয়ে  চেয়ার  থেকে উঠে যাই {যা উপস্থিত  সাবাই দেখেছে}।আমি দুই দিন দরে তাদের এই দুইটি নাম্বার থেকেও অভিযোগ জানিয়ে ছিলাম {01816842549 এবং 01828446841} কিন্তু তারা আমকে বার বার আমার সম্যসার কথা জিজ্ঞেস করে কথা শেষ করে দে।তারা বলল আমাদের info@banglalionwimax.com মেইল করে আপনার বিলের ছবি সহ পাঠায় দেন ।কিন্তু তাদের মেইল পাঠালে অটো রিজেক্ট করে দে যত বার পাঠায় না কেন । এই দেখুন তার ছবি
তার মানে এক মাসের টাকা দিয়ে ১৫ দিন ইউস করার পর আর ইউস করেতে পারবো না।তার উপর গালাগাল ও শারীরিক হয়রানির শিকার হলাম,আরও নাকি আমাকে ৬০০ টাকা দিতে হবে। সবশেষে আমার একটি প্রশ্ন এই জালিমদের কি কোন দিন বিচার হবে না ????

পিসি সুইট ছাড়া আপনার মোবাইল দিয়ে কম্পিউটারে নেট কানেক্ট করুন Bluetooth দিয়ে ।


আপনারা সবাই আসা করি ভাল আছেন । আমি প্রায় দুই বছর ধরে টেকটিউন্স পরে আসছি, কিন্তু কোন পোষ্ট লিখি নাই আজ লিখলাম । আজ আমি আপনাদের দেখাব কিভাবে Windows 7-এ পিসি সুইট ব্যতিত Net কানেক্ট করতে হয় ।
আপনারা প্রথমে কম্পিউটারের ব্লুটুত অন করে নিন । তারপর Start বাটনে ক্লিক করুন । তারপর নিচের চিত্রের মত Control Panel-এ ক্লিক করুন ।
Control Panel ওপেন করে Hardware and Sound এ ক্লিক করুন
তারপর Devices and Printers এ ক্লিক করুন ।
তারপর আপনি Menu এর নিচে Add a device লেখা দেখতে পাবেন, সেখানে ক্লিক করুন এবং আপনার মোবাইল টি কানেক্ট করুন ।
কানেক্ট করার পর আপনি Menu এর নিচে যে জায়গায় Add a device লেখা ছিল তার পাশে একটি লেখা দেখতে পাবেন তা হল Connect Using সেখানে ক্লিক করলে অটোমেটিক কানেক্ট হয়ে যাবে এখন আপনি নিশ্চিন্তে নেট ইউস করতে থাকেন । আজ এই পর‌্যন্ত আপনাদের অনেক সময় নষ্ট করলাম । আমার জন্য দোয়া করবেন । আর কোন সমস্যা হলে কমেন্ট করে জানান। ধন্যবাদ

ALL IN ONE( WINDOWS SYSTEM CARE)

একটি সফটওয়্যার দিয়ে আপনার পিসির সকল সমস্যার সমাধান হবে। এই সফটওয়ারটিতে পাবেন। Antivirus, Uninstaller, Registry Cleaner, Disk Cleaner, File Shredder, Process Manager, Driver Manager, Unlocker, Smart Ram, Interner Booster, Startup Manager,  Registry Defrag, Smart Defrag, Undelete, Shortcut Fixer, Disk doctor, Win fix, Disk Explorer, Cloned file scanner, Empty folder scanner, System control, System information, Auto shutdown, Malware Removel, Privacy Sweep, Secutity Sefense, Junk files clean & others.
 Simplified Mode
 
 Expert Mode
V

V


এটি সেটআপ দেওয়ার পর মনিটরের উপরে একটি ছোট বার দেখাবে। এই বারে সিপিইউ এবং র‍্যাম কত ??% কাজ করছে সেটিও দেখাবে।