Showing posts with label DISTRUB ANY VICTIM PC. Show all posts

How To Show Hidden Files & Folders in USB Drive / Pendrive (Virus Removal)

Have you wondered where your files have gone from your USB Drive without deleting them? Are you searching for your files saved on your Pendrive? Well, if you are facing the same problem, you are in a big trouble. Your USB Drive or Pendrive got affected by virus. Basically, this thing happened only due to viruses. USB Drives are the very first thing to spread viruses from one PC to the another. Just because of that, you won’t be able to view your saved files and folders from your Pendrives and USB Drives. To get all of your files back, you have to get rid of that virus. If you got stuck with the same problem, you have to follow the below given tutorial. How to show hidden files & folders in USB Drive, is very well explained in the following tutorial. Useful details are as follows!
Remove virus from Pendrive
Basically there are plenty of ways to see hidden files and folders from your USB Drive, however, your Pendrive got affected by Virus and for that you have to remove that particular virus from your pendrive to see your saved files and folders, which are being hidden by Virus. To remove this virus and see all of your files, you just need to follow the below steps.

How To Show Hidden Files & Folders in USB Drive / Pendrive (Virus Removal)

Step 1 :
The very first thing you need to do is insert your Pendrive or USB Drive into a USB port of your PC.
Step 2 :
Once your device get recognised, go to My Computer and see the assigned letter to your Pendrive. It could either be F drive or E Drive or something else, you have to remember it for a while.
Step 3 :
Now, open Command Prompt Window of your PC. To do so, go to your Start Menu and hit the Run option. In run box, enter cmd and hit the enter button. This way you can get the command prompt window displayed on your screen.
Step 4 : 
After this, you should see a cursor on your Command Prompt to enter our text. Here you have to enter the Pendrive’s drive letter. If your USB Drive is showed as drive J enter J and hit the enter button.
Step 5 :
After this, you have to manually type in the folder or file’s name is being missed or hidden. You have to navigate to that particular file or folder. If you don’t know the exact way of doing this, type in CD in capital letters and hit the enter button. There you can see a list of all the files from which you have to select the missing files.
Step 6 :
For example if a folder named tekplz is being missed from the drive, you have to type in the following command into the command prompt window. Make sure to type the exact letters including all the given actions.
attrib “tekplz” – h
After typing the above command, hit the Enter button.
Step 7 :
You’re done! You have successfully removed the actual virus from your USB Drive. You can get the access of that particular file or folder which was missed from your drive. To do so, follow the below path.
My Computer>> Go to your USB Drive>> Click on to the Drive>> tekplz
See, this is how you actually can get all of your hidden files and folders from your USB Drive. If you are from a non tech background, you can ask for any technical person’s help who can follow the above given steps from your Windows PC.
The next way to unhide manually hidden files is from your own Windows PC. Windows allows you to hide particular files and folders from your drive so that no once can see those files and folders easily. If you don’t know the way of unhide or hiding the files, follow the below path.
Go to Organize option, which can be found under the address bar and then click on to the View option. You would see a new Window with a number of different options. There you would have two different options with radio button. Here you can select a proper button whether to hide the files or to unhide them. You can easily make changes to the files right from here instantly!
What’s your take? Did you find it a helpful tutorial? Do let us know your views and opinions on the above tutorial. If you know any other way to see hidden files or to remove virus from Pendrive, do share your thoughts and experiences with us. Meanwhile, if you have any other questions or queries or any doubts, kindly put your words as a comment below the comment section. We would like to interact with you regarding the tutorial. Your feedback and suggestions are always welcomed!

How to Eject USB Flash Drives in Mac OS X

Apple is not just a brand name, it’s like a dream of Millions of people out there. When there’s Apple, there’s everything. If you are someone who related directly or indirectly with technology, must be aware about Apple and its product. When it comes to a Computer, there appears two names, a Windows PC and a Mac system. I’m pretty much sure that you are here to see something useful for your Mac system which indirectly indicates that you are a newbie who just owned a Mac system. Am I right that way? Well, here we are running a series on Mac’s tutorial to guide you well on Mac and its uses. Today we came up with a turorial on, how to eject USB Flash drives in Mac OS X instantly without getting messed. If you don’t know how to safely remove a device from your USB port, this tutorial could help you out instantly.

Eject USB Safely

Mac is known for its simple and on the go services. Unlike the Windows PC, here in Mac you can get all of your basic things done without messing up with many things. You can easily do all the tasks right from your Trackpad, you just need to swipe your finger on to the trackpad and you’re done! To know how to remove USB Drive safely on a Mac system, you just need to follow the below given simple steps. These steps are very simple and anyone, even if you just owned a Mac system, can make use of this trick right away. Before talking further, let’s get on to the tutorial directly and see the process right away!

How to Eject USB Flash Drives in Mac OS X

Step 1 :
Scroll your finger down on the Trackpad and the Dock will be presented to your Desktop along with all the useful option. As you know to bring your Macintosh’s hard drive on the screen, you need to open the Finder of your Mac. Click on to the Finder icon from the Dock.

Step 2 :
Finder will get you all the information about your Mac’s hard drive. It will show you everything installed on your Mac system including all the apps, downloaded files and pretty much everything on the go. If you have attached a USB Flash Drive to your Mac, it will show you the name of that particular USB device under the Devices options. Devices option will show you all the externally attached USB Flash Drives into the same list.
Step 3 :
Click on to the right side of the USB Device’s name and it will show you a number of options. Eject option is right there, click on to that option and USB Device will be removed safely from your Mac.
Step 4 :
If you find it a bit annoying, there’s one more trick to get rid of this annoying need of yours. Just click on to the USB Device’s name and drag it down into the Trash option into your Dock. Simple as that. This way your USB Device will safely be removed.

Top 11 Free Online Video Converters

Top 10 Best Free Online Video Converters – Have a look at this ultimate list of the best free online video conversion tools to convert your videos from one format to another online for free: We often need to convert a video file for the sake of compatibility on various platforms / devices. Online video conversion offers significant advantages over any desktop app. As a cloud based service, it could be used anywhere and on many different platforms without the need to download or install anything. If you’re on the move, an online video converter serves your  needs perfectly.
I compiled a list of the best free online video converters on the web. These consist of both PC and Mobile oriented sites. Ease-of-use, learning curve and portability were taken into consideration.
This is the start of a series of web tools I will be doing in the coming days. I love web tools as they offer the utility of desktop apps with the reliability of the cloud and flexibility of platforms combined with the advantage of portability. You know something’s awesome when it has so many associated nouns that end in ‘-ity‘. Let’s roll

Best Free Online Video Converters


Cloud Convert :

Cloud convert, as the name suggests, brings the power of the cloud to your video conversion process. It offers options to upload files from Dropbox and Google Drive and the ability to send your converted files to the same upon completion. You can also opt to receive an email notification once your conversion is done. It’s list of services is quite extensive with support for Video, Audio, Cad files, Spreadsheets, Presentations, E-books and Documents.
Cloud Convert


Online Convert :

Online-Convert.com is one of the most comprehensive online media converter on the web. The site hosts not just video converters but also audio,document,image,archive and e-book converters. It also has a hash generator. Upload a file from your desktop or any site (direct link), select output format and quality and convert it with ease. It gives you a download link in mere seconds after upload. Highly Recommended.
Online-Convert


Media Converter :

Media Converter is a simple online video converter where you’re presented with a window to upload your file and convert it into desired format. However, you only get 5 free conversions per day. Output formats include WMV, AVI, MP4, OGG etc.

N°1 Free online Video Converter :

N1 Online video converter greets you with a homepage that asks you to select your region so as to provide a server closer to your location. You can convert videos from Youtube or upload files from your own PC (Video & Audio) to be converted. Click ‘Save as’ once finished. It is simple and free and the whole process takes just a few minutes.

Wap 4 :

Wap4 is an open-source online video converter site that specializes in mobile video formats. Max upload files size is 100MB. Upload. Convert. Save to PC instantly. Simple.

Files Conversion :

Files-conversion.com maybe the simplest online video converter yet. It offers options to set quality from low to very high and the ability to change video size. Converted files can be instantly saved to PC.

File Wiggler :

File Wiggler is another free online media converter that supports a large variety of formats. You can upload videos upto 200MB in size. If you refer 5 people you can upload upto 400MB of videos. The only gripe here is the conversion is not instant and links will be E-mailed to you in about 3 days after upload.
File Wiggler


You Convert It :

You Convert it offers free online video conversion in a simple one page setup. Just upload files from your computer and the converted files will be E-mailed to you upon completion. Supports 3GP, MOV, AVI, WMV, SWF etc.
Also check this out: Best 3GP & MP4 Video Converters for Free Download

Convert Videos Online :

Convert-video-online.com offers a clean, simple interface where you uplaod a file from your PC and convert it instantly with zero hassles. It offers HD formats to convert your files to and the conversion process itself is blazing fast and the download link is presented immediately.
Online Video Converter


MakeJar :

MakeJar is another site that specializes in mobile phone video formats. The output formats are given in the form of profiles i.e a list of phones is available from which you can select your phone to start converting your video. You can save the file to PC post conversion. HTC, Nokia and some Samsung models are presently listed on the site.
MakeJar

Convert Files :

It’s a free  online converter capable of processing files up to 250 MB in size. You can upload from your PC or a URL (direct link). You can also upload videos from popular video sharing sites like Youtube, Metacafe etc. The conversion support is extensive ranging from Videos to Archives and even Drawings.

Conclusion : To wrap things up, Online video conversion simply rocks and you should definitely give it a spin if you haven’t  used it yet. Choose a site from above that best suits your conversion needs. After all, why bother downloading an app and straining your PC when you can leave all the heavy-lifting to a cloud based service. The server does the grunt work while you get to download & enjoy your converted files in the desired format for free.
You might also love to check out this list of the: Best Video Converters for Windows & Mac OS X

Download for PC

how to disable copy paste in blogger

Usually how do we copy a content from a docs ? We would select the content we need to copy down and use short cut keys or Right click and Select copy. How about disable selecting text itself , then readers couldn't use shortcuts and even though they couldn't copy down using right click options.

So i recommend this method to bloggers who wish to protect their contents from content thieves.
Actually this script is free and very popular among website masters.

Lets go :
  1. Sign In to Blogger account and go to relevant blog.
  2. Go to Page Elements from Design  and Click on Add a Gadget and choose HTML/JAVASCRIPT from the gadgets.
  3. Now Copy down the popular code and Paste it on the selected Gadget and Save it.

  4. <!--Disable Copy And Paste-->
    <script language='JavaScript1.2'>
    function disableselect(e){
    return false
    }
    function reEnable(){
    return true
    }
    document.onselectstart=new Function ("return false")
    if (window.sidebar){
    document.onmousedown=disableselect
    document.onclick=reEnable
    }
    </script>
  5. Now refresh your Blog and Right Click on it. Done!

How To Add Twitter Timeline Widgets On Blog

Twitter is more conscious about twitter widgets and tweet buttons for websites and blogs.As part of this  twitter developed more features on their widgets.Earlier times,there had only Tweets widgets which displays your tweets. Today morning,twitter introduced new widgets for favorite tweets,List tweets and Hash tag search.
And you can publish any users timeline tweets (public) on your websites.

How To Add this Widget on your Blog ?

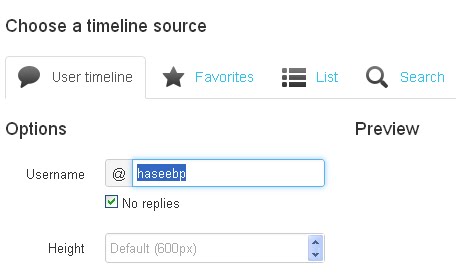
  • Go to Widgets settings on your twitter account. (https://twitter.com/settings/widgets) .
  • Click on 'Create new" button on right side  of the particular page.
  • Choose your  Timeline source, and scroll down your page and click on 'Create Widget' button.
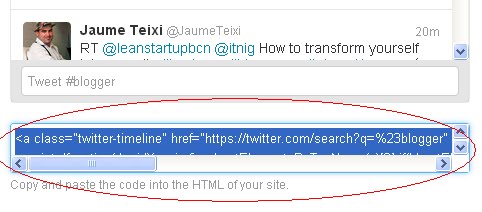
  • Copy down the Code and Paste in HTML/Java script Box in your Blog.
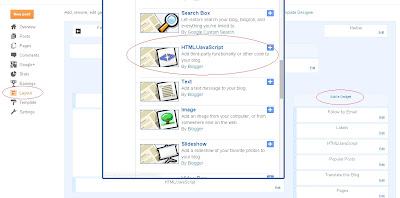
  • Now Go to Blogger.com --> Layout --> Click on 'Add a Gadget'  --> and Choose HTML/Javascript widget from the list.
  • Paste this code and Save. Refresh your blog and see your tweets on your blog.

21 Tips To Get Adsense Approval For Your Blog

Many of us do apply adsense for monetizing our blogs/websites, and among those 90% gets rejected by the adsense crew, Some may even take a wild path by creating another email account and tries again, but alas, the result would be same, rejected.!! and Thats the moment at which they thinks to seize their blogging. 
I really don't have a shortcut recipe for adsense approval, but i do have few tips, which most of you might be unaware or unnoticed. Following these simple steps could help your blog's adsense approval. 
First of all,don't feel dejected after your adsense got rejected,because you are not within the terms of adsense. Don't be late to check out your email to know what went wrong in your blog/website. Google adsense team is so kind that, they informs you the reason behind rejection. 
  
  1. Use Professional or Minimal design for your blog, because it makes things easy for your reader and Google. Don't fill your blog with fancy stuffs like background sound,fancy mouse pointers,glittering texts etc
    , because it makes your blog laggy,  increase page load time which annoys user. 
    Make the Google adsense team and your user impressed with your design and work. 
  2. Navigations are veins of a website, it is the most essential part. Make sure that it is clean and user friendly. 
  3. A messy Sidebar could mess with your adsense approval, Thus don't fill your Sidebar with live,fancy widgets.Just use a 'popular posts' , 'categories' and a subscription box.It is more than enough in a sidebar. 
  4. The word copycat should not be in a bloggers dictionary, copying content from any other websites is strictly a violation of adsense terms. Google Adsense demands fresh,genuine,relevant,unique and quality contents from bloggers. 
  5. Don't think about monetizing your work before perfect time arrives. wait until you get some returning users, wait until your site rank gets increased and then monetize. 
  6. Avoid copyrighted images,videos,and scripts.Don't copy down images from Google search,Bing and other search engines as it is a serious violation of adsense terms. 
  7. Don't make your blog post short,and not so lengthy. Around 400-500 characters are good and standard. Always keep in mind that you are writing for humans, not for computers. 
  8. Before applying for adsense,make sure that your blog have enough content (around 40-50 quality post) and traffic. Many applications are rejected by the reason of "In sufficient content". 
  9. It is recommended not to use any other ads networks at the time you applys for adsense . 
  10. Make sure that your blog/website contains adsense approved languages only. 
  11. Use a custom domain for your blog,just to assure the adsense team that you are a serious blogger. 
  12. None of us love to read a website which contains mature content with family, so does adsense, except that it never likes a mature website. So it is recommended to make your content family-safe. Avoid content like 'buttocks,close-ups of breast,provocative poses,see-through clothing and strategically covered nudity and other mature content. Also see prohibited content . 
  13. Avoid too much images in a single post. I've seen so many with too much images in a single post , especially in fashion blogs. If you want to show your works or something using a set of images you could always approach flickr or picasa for creating slideshot of desired pics. Remember,Google bot crawl only those content with text not images. 
  14. Make following your work easy for your users by creating an RSS Feed for your website/blog, which acts like an automated sitemap for your site. 
  15. Feedbacks are well and good, Integrate your blog with your personal Google+ account. which in-turn increase your back-links and gives you a little support for adsense approval. 
  16. Don't forget to submit your sitemap so that Google could keep track of your site's activities, which results in your site's ranking incrementation. in order to submit your sitemap to Google  you should use Google webmasters tools. You could also use Google analytics for SEO purpose. 
  17. Update Your Blog at least twice in a week. 
  18. It is recommended that you should use an responsive design for your site, or at least have a mobile version as they are in a pursuit of becoming the primary internet device. 
  19. Never send request for Google adsense until your blog customization finishes (Under construction) or in beta condition. 
  20. Never forget to read TOS and policies of Google adsense . 
  21. And finally, your users are your cash, don't disappoint them. 
Also visit Google Adsense Help Center. If your blog is ready and comply all Google policy,Just apply for Adsense 

Has your website or WordPress blog been hacked?

Is your site displaying the “This site may be hacked ” warning at Google.com or Bing.com?
Web site hacked or web site blocked by Google?
With over 15 years experience, and a long list of “verifiable” satisfied customer service testimonials, The Hack Repair Guy™ will remove malware, work to fix website security issues, recommend free techniques to monitor and prevent future attacks, install WordPress security plugins, and even repair basic WordPress errors; all for a reasonable flat rate, no matter how long it takes to resolve. Heroic Customer Service— it’s what we do! 

We clean most infected sites of malware within two hours and unblacklist websites within 24 hours. Why choose HackRepair.com?

  • Service
    We’ll discuss your situation by phone to determine how quickly we can repair your website.
  • Expedience
    We’ll clear your website of malicious scripts and malware then get your web site back up and running quickly. We are WordPress CMS experts as well.
  • Comprehensive
    We’ll help recover and unblock your site within Google and help you in clearing any Google.com or Bing.com website listing issues.
  • Education
    Our goal is to help prevent your website from being hacked again. We install security and security monitoring plugins, and will train you on how to use them free of charge as well.
  • And don’t forget our money back guarantee!


How can we guarantee we will clear & recover your hacked website?

video testimonial for hackrepair.com
  • We’ve been securing websites since 1997.
  • We have developed a range of tools to help quickly identify and clear malicious scripts or hacker code from your website pages.
  • Our friendly, knowledgeable staff is ready and available to assist you on your schedule.
  • We do not outsource our work; everything is done in-house here, in the USA.
  • We will work directly with Google on your behalf to ensure your website is unblocked within Google.com or Bing.com as quickly as possible.

Don’t let your reputation be ruined as a reported attack page. Call
(619) 479-6637 or toll-free (800) 639-6442, and let us help to repair your reputation immediately!


Other Common hack related terms and information relating to how to clear hacked websites:
  • iframe hack – sometimes called an iframe injection is often used by hackers to redirect visitors to other websites or force a software download upon visiting the hacked website.
  • Base64 code – is a common means hackers code their web page hacks. This obfuscated code makes it harder to find hacker code on a web page. A server admin searching a server for hack related text may often miss files injected with obfuscated base64 PHP code because the obfuscated code conceals the usual suspect phrases. The “pharma hack” often uses base64 or obfuscated coding.
  • Botnet – is a large collection of hacked PCs, sometimes called zombie computers. These PCs once controlled may be used to send junk e-mail or bring down web services. Botnet’s are often the means by which denial of service attacks are initiated.
  • ‘hacked by hacker’ – was a well known server wide compromise which took advantage of a vulnerability relating to the symbolic links setting within cPanel configured web servers. A number of web hosts fell prey to this cPanel related exploit, which allowed hackers to replace most of the “index” type pages of accounts configured on server with a text file containing the words, ‘hacked by hacker’.
  • Zero-Day exploit – Affecting both websites and computers, the zero-Day exploit is a term describing not yet documented security threats or vulnerabilities.
  • Denial of service attack – or distributed denial of service attack (DDoS), is a distributed attack on a network or service. Because these types of attacks originate from so many locations simultaneously they often result in hours of downtime until mitigated.
  •  
  • Common search engine and web browser alert messages include:
    Google – ‘This site may be hacked.’
    Google – ‘This site may harm your computer.’
    Google – ‘This site may harm your device’
    Google – ‘This site may be compromised’
    Bing and Twitter – ‘unsafe link’
    Chrome – ‘Warning: Something’s Not Right Here!’
    Chrome – ‘Danger: Malware Ahead!’
    Firefox – ‘Reported Attack Site!’
    Internet Explorer – ‘This website has been reported as unsafe’
    Opera – ‘Fraud Warning’
    Safari – ‘Warning: Visiting this site may harm your computer’
    Yahoo – ‘Warning: Hacking Risks’

How To Deface A Website With Basic HTML Coding In Just 5 Minute

I was browsing the net when i saw this tutorial:

Source: http://naijadudes.com


Steps:

Open the site you want to hack. Provide wrong username/password combination in its log in form. (e.g. : Username : me and Password: ' or 1=1 --)An error will occur saying wrong username-password. Now be prepared your experiment starts from here.


Right click anywhere on that error page =>> go to view source.

3. There you can see the HTML coding with JavaScript.• There you find somewhat like this....<_form action="...Login....">• Before this login information copy the URL of the site in which you are. (e.g. :"< _form..........action=http://www.targetwebsite.com/login.......>")

4. Then delete the JavaScript from the above that validates your information in the server.(Do this very carefully, your success to hack the site depends upon this i.e. how efficiently you delete the java scripts that validate your account information)

5.Then take a close look for "<_input name="password" type="password">"[without quotes] -> replace "<_type=text> “there instead of "<_type=password>". See there if maximum length of password is less than 11 then increase it to 11 (e.g. : if then write )

6. Just go to file => save as and save it anywhere in your hard disk with ext.html(e.g.: c:\chan.html)

7. Reopen your target web page by double clicking 'chan.html' file that you saved in your hard disk earlier.• You see that some changes in current page as compared to original One. Don't worry.

8. Provide any username [e.g.: hacker] and password [e.g.:' or 1=1 --] You have successfully cracked the above website and entered into the account of List user saved in the server's database.

Warnings

Do the coding and changes very carefully, your success to hack the site depends upon this i.e. how efficiently you delete the java scripts that validate your account information.

Please like this post if it worked for you

Reset Admin Password of Windows XP, Vista and 7

This trick enables us to change the password of Windows Operating System Using Ubuntu 9.10 distribution installed on a usb drive.   Eventhough the titile states on XP, Vista and 7, the trick you are gonna read is also for 2000 and 2003. This method is applicable when you have some Alzheimer’s disease and you forgot your most important Windows login password.  And probably you do some idiotic things with all the password possibilities you know and then your account gets locked up. So there when you stand without knowing what to do, this trick comes to the rescue.
What do you need :

1) Unetbootin
2) Ubuntu 9.10 ISO (You can also download it using Unetbootin)
3)  chntpw
4) A Usb drive (1 gb or more)
Steps :
First we need to install Ubuntu 9.10 to the USB drive..  Open Unetbootin in a computer other than the target computer (you couldn’t do it on the target computer as it is already locked or forgotten password)
Select Ubuntu 9.10 or Select the “Disc image” option and select the path where you have downloaded the ISO. Select the type as USB drive and select the drive where the usb drive is displayed. Click Ok..
Then Wait..
It installs…
When it is done, click on “exit” and remove the USB drive. Yupeee!! You now have the live image of Ubuntu 9.10
Insert the Usb drive into the target computer. Start the computer, Boot from the usb drive. If it does not come, you may have to change the boot device preferences in the BIOS.
When you boot from the USB drive , the unetbootin options comes and you have to select “default” . Thus it boots into Ubuntu OS. Now you have access to the windows filesystem. Hurray!!
Now we need the tool chntpw. To get this software, connect to the internet and run the command :
sudo software-properties-gtk --enable-component=universe--enable-component=multiverse; sudo apt-get update; sudo apt-get install chntpw
Go to the terminal and change the directory to the password file
cd /media/path/to/disk/WINDOWS/system32/config/
Now run the chntpw tool
# sudo chntpw -u username SAM SYSTEM
When it is executed, it will just erase the password. Now you could restart and log into the windows without the password.
Anyway, as a security precaution , you may backup the data  in the hard disk, what if you mess it all up?? lolz..

Fake Antivirus Software which themselves are viruses - Beware!

Guys in this world of advanced digitalization, it is very necessary to be safe from various network threats like Viruses, Trojans, Malwares, Spywares, etc…

Generally the user is not having much advanced knowledge to how to stay secure in this world of WWW. So he generally uses one or the other antivirus programs which in turn keeps monitor on the system to stay the user safe.


What is Antivirus and how does it works?


Antivirus is a software program which is built to monitor the user system for all the known threats. That means it has a database of all the known threats, when your system comes across any of such threats it protects you as it has ability to resolve the treat or if not possible to clean at least it can stop the threat to attack the user system.

Again it can protect you with all the threats which are known to the software company whose antivirus you are using. All the antiviruses keep on updating their virus definition database as soon as they come across any such threats.


You can read this link about my review of best antivirus for your system so as to be safe from virus attacks

But do you know, you, me or anyone with some programming skills can create a new virus, which in turn won’t be detected by the Antivirus. Why? Because that virus is still unknown to the Antivirus company. It takes some time to the company to identify the threat and release the updates. Whereas the user unaware of this entire thing thinks that he is totally protected from the viruses and various other threats.

So it’s good to have an antivirus software installed in your system, but it is also required that you stay alert to avoid unnecessary security issues in your system.


Let me tell you some of the Virus Programs, which claim that they are Antiviruses. So Next time you come across such situation, stay alert! Your Information security could be in danger.


Have you ever came across a situation in which you are surfing a website, any random website of news, blogs or whatever and you get a message that “Your PC contains virus, click here to scan for free”

Free… When the user read this word free, he just clicks on that application and that application will scan your system and tell you that you 400+ errors/viruses and, you need to purchase to the full version to fix the problem.

The problem doesn’t end here. Even if you decide to not to buy the software, you won’t be able to uninstall the demo application which you installed to scan your PC. Many applications which were working perfectly fine before installing this so called Virus scanner, now doesn’t work. Your PC started giving you error message and your PC starting crashing every now and then. 

 
This is not because of the viruses the antivirus program which you downloaded from internet reported you. It is that same program which is the reason behind the error messages, frequent crashes. This is just a marketing skill. Once you start facing such issue, you feel that the PC is infected with virus and you buy that fake antivirus by paying large amount of money.

So next time when you are buying any new antivirus, it is always advisable that you take advice of some expert person and also never ever use any of the online scanner, antivirus tools claiming that you have virus in your PC. They are nothing but fake malwares.

Let me show you some of the most famous Malware or fake antivirus which claims to be best antivirus programs.Most famous and the one which tops the list is Rouge Scanner.
 
This scanner is available on many torrent sites, free download sites. It claims itself as free online scanner and antivirus program. Which on scanning will give you lot of fake virus alerts and to fix this issue you have to buy the full version.

  1. Rouge Scanner is available on internet with various names such as MS Antivirus / WinPC Defender

Names are very much similar to the security application of Windows, that is Windows Defender and generally MS is used as a short form for Microsoft. But be aware there are fake antivirus programs. Just using such names to disguise the users and to prove it that it is an authentic Antivirus program.

Once installed this software, you won’t be able to uninstall the software and even your antivirus on most cases doesn’t warn you for this kind of fake antiviruses.
 2. Security Tool
Another such fake antivirus program is Security tool also known as Total security. It displays the security alert which is exactly similar to one’s which appear in windows defender for Vista and Windows 7. Screen similar to Windows Security alert can disguise anyone and can fall in to the trap of fake antiviruses.

It eliminates the icons from desktop, slowdowns the system, disables Task manager, corrupts the Registry, etc…

3. Internet Security 2010

The name is similar to one of the most famous and prestigious antivirus software i.e. Norton Internet Security, but always have a keen eye and be aware that this is a fake antivirus program.

Also known as IS2010, after installation blocks YouTube, Facebook and many more important website’s access and thus forcing user to buy the full version by paying hefty amount of money. It displays many fake error messages saying that all your data will be corrupted and so on making user forcibly buying the full version of this fake antivirus program.

URL:-http://virus.geeksailor.com/how-to-uninstall-remove-internet-security-2010-virus-removal-guide/
4. Anti-Malware Defender
 
This fake antivirus/spyware is often disguised as a Windows Defender from Microsoft. It is almost impossible to distinguish between the original windows defender screen and with this fake anti-malware defender screen.

This fake antivirus will block up your browser and constantly keeps on showing fake virus alert messages.

URL:- http://www.2-spyware.com/remove-antimalware-defender.html 
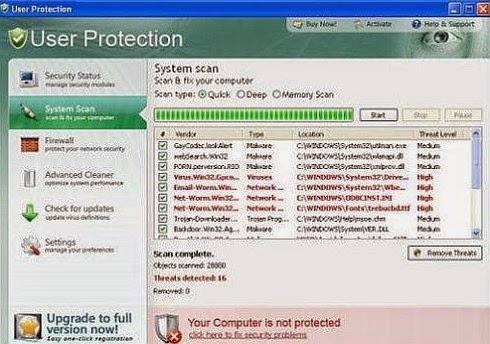
5.    User Protection

Again one of the famous fake antivirus programs, it propagates through fake video codec’s manipulated to any website which display videos streaming such as YouTube. When you try to view the video in the browser it will ask you that the plugin is missing. Once you click on install plugin, along with the codec this fake malware get installed in the user system.

This fake application has ability to block your applications from running it properly; it could also result in system crashes.

URL:-http://www.spywarevoid.com/remove-user-protection-userprotection-removal-help.html

This list is never ending and it keeps on changing their names and their functionality of working from time to time. The main thing to keep in mind is never trust any application from internet until and unless you are totally downloading from trustworthy websites.

Also never accepts any such error message which claims that your PC is infected with virus or so. Never use any such application which claims that by fixing your registry it can speed up your computer. All those applications are mere marketing skills to earn money by faking people.