Improve search engine Visibility.

Today I am going to tell you some best ways how to improve your blog ranking on Search engine, Alexa-Rank and Google Page Rank. this is basic information about SEO next time we lunch complete course about SEO pack for blog so please subscribe our blog and join our community for learn best things about blogging .

1. How to improve search engine Visibility?

Improving search engine Visibility is that the #1 target of each websites to make it on the highest of each Search Engines results page and it isn't only depending on 1 criteria, rather it is a combination of Back-links  Page-rank  web traffic/impressions, uniqueness, and content quality of a website.

Here are some ways we can increase search engine visibility.

2. What is Alexa and how to improve it?

Alexa shows your site's current estimated position and rank on the internet. to improve your Alexa, you need to have many Back-links  high Page-rank  and thousands of internet traffic/impressions. Alexa doesn't update in real time and usually takes three months to detect your true rank.

Here are some ways we can increase Alexa page rank.
  • Claim your site on Alexa
  • Install Alexa Widget on your site
  • Write a review about Alexa on your blog
  • Install Alexa Toolbar on your browser
  • Build quality back links
  • Ask users to write a review on Alexa

3. What is Page Rank and how to improve it?

Unlike Alexa, Page-rank only shows your site's current estimated position on the web. to improve it, you need to have a lot of Back-links and articles. Like Alexa, Page-rank does not update in real time.

Here are some ways we can increase Google Page Rank.
  • Write high quality content 
  • Submit Your Site to web and article Directories
  • Use Link Exchange Program to increase back links.
  • Keep updating your site/blog everyday
  • Use Social Bookmarking button to share you site on social sites
  • Website Advertising
  • Commenting On Other Blogs and Websites

Easily Submit your Websites to Search Engines for Free

Submit your Websites to Google, Yahoo, Bing Free
Search engines are programs that search documents for specified keywords and returns a list of the  documents where the keywords found. A search engine is really a general class of programs, but the term is often used to specifically describe systems like Google, Bing and Yahoo! Search to help users search for documents on the World Wide Web.

In order for the three SE giants to simply sight or index your websites, you need to submit them first to their information. Below square measure the best way to submit your websites.

Submit your Site to Google

To submit your website to the Google index, all you have got to try to to is go to www.google.com/addurl/. Enter the URL for your home page into the suitable box (including the http://), add any comments you may have concerning your website, so click the Add URL button. That’s it! Google can currently add your website to the Googlebot crawl list, and your website can seem in applicable search results.
For advanced users, visit https://www.google.com/webmasters/tools/.

Submit your Site to Yahoo

Submitting your web site to Yahoo! is an equally easy method. go to http://add.yahoo.com/fast/add?54397758 click `Standard Consideration > Continue . Taking the easy approach, all you have got to try and do is enter your website’s computer address into the Submit an internet site or Webpage box; certify you embody the http:// prefix. once coming into your computer address, click the Submit computer address button, and you’re done.
For Advanced Users, Click "Yahoo! Directory Submit"

Submit your Site to Bing/MSN


Google and Yahoo! are simply two of the large three search engines; you must also submit your website to Bing/MSN. visit http://www.bing.com/toolbox/submit-site-url and enter your entire website URL into the box (including the http://) and so click the Submit URL button. like the Google and Yahoo! submission services, Live Search’s MSNBot crawler are instructed to crawl your website and index all the internal pages linked from your home page.
For advanced users, visit http://www.bing.com/toolbox/webmaster/

Submit your Website Sitemap To Webmaster Tools....easily

Add Blogger Blog and Website to Google Webmasters Tools

Submit Website Sitemap to Google Webmaster tools is a must for anyone that want to be successful. Once you get verified your site to webmaster tools, then automatically get indexed your site to Google search engine. When your site come to search engine then you will get a lot of traffic.

Follow the easy steps to add Website to Webmaster Tools.

If you create blogs using Blogger, you can automatically add and verify sites by enabling Webmaster Tools directly from the Blogger dashboard.


  1. Log in to https://www.google.com/webmasters/tools/ with your Google account.
  2. Click "Add a site...", enter the base URL of your Google Site in the box that pops up, then click "Continue.".
  3. You will be given with many verification methods. select the Alternate methods tab.
  4. Select the option: Add a meta tag to your site's home page
  5. Copy the meta tag (for example, <meta name="google-site-verification" content="z7mJLjVGtEe2qzCzfE1pamxI4H72u18n4XdxEzgl2AJ" />) from the Instructions box.
  6. Leave the verification page open and go to your site dashboard (in a new tab/window).
  7. Paste the meta tag that you copied on the Google Webmasters Tools after <head> tag in your website. ( "Blogger" go to site Deshbord click Templates > Edit HTML > Ctrl + F and find <head> tag after past  meta tag that you copied on the Google Webmasters Tools.
  8. Click on Save Changes.
  9. Go back to the verification page and click Verify.

Submit Blogger Blog Sitemap To Webmasters Tools


An XML sitemap is a fairly simple XML file that contains info about one or additional URLs on your web site. it's updated whenever you post an article and used by Search engines to crawl blog information. Not only Google but also use by different search engines like Yahoo, Bing,etc. if you can create blog on blogger.com then you do not need to create site map and if you can use hosting & other site or manuly create site map use sitemap create tools, I'm using this tool http://www.xml-sitemaps.com.
Follow the easy steps  to submit Sitemap to Google Webmaster Tools.
  1. Sign in to you Google Webmaster Tools account.
  2. Click on the blog.
  3. Navigate to Traffic > Optimization > Sitemaps and click ADD/TEST SITEMAP button and add the following code inside the box :
atom.xml?redirect=false&start-index=1&max-results=100
If you have more than 200 posts then replace value 100 by something bigger number like 500.

You have successfully added Blogspot blog sitemap to Google Webmasters Tools.

Display Author image in Google Search Results

Now a days all the bloggers have an interest to make their profile image in Google search results. because it will increase the traffic to their blogs and websites, and build the readers or visitors to search out the blog simply.


Google Web Search result snippet showing authorship information

It is very easy method to make your image appear on Google search results. Follow the steps below:

1. Create Google plus profile (if you haven’t already) Click Here for create Google Plus Page

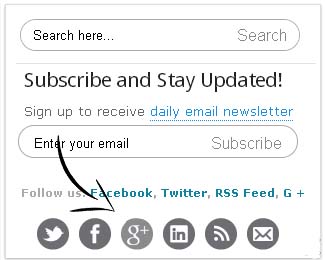
2. First add your Google plus Profile link anyplace on your blog sidebar using the following code:

<a href="Google Plus profile Link" rel="author" target="_blank"> Join me on Google+</a>
Replace Google Plus profile Link with your profile link  and Change join me on Google+ with your link or images
This is how it looks on the blog:

google plus link in sidebar


3. Create "About me" or "author page" on your site (if you haven’t already).here is my About page that i used, and link the about page to your Google Profile page using the rel=”me” tag. and upload a image into about page.
<a href="https://profiles.google.com/YOURID" rel="me">My Google+ Profile</a>

Note: you need to place your Google Id in place of ”YOURID” . to get your id click profile on left menu on your google+ page. now look at the url.

profile id

You’ll also want to place a link back to your bio page in your blog, with a rel tag that says “author”.
<a href="http://bloggerknown.blogspot.com/p/about.html" rel="author">About Me</a>
Note: you need to place your about page in place of ”http://bloggerknown.blogspot.com/p/about.html”.

This is how it looks on the blog:

about link in footer

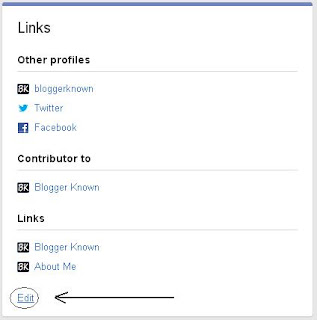
4. Now go to your G+ profile and click the About page scroll down here you will see Links click Edit and
Cross-Links via Google Plus Profile
Add your blog homepage url and additionally the url of your about us page. you can also add your Facebook and twitter links if you want.
5. Now go to Google Rich Snippet Testing Tool. and submit your homepage link in the search box and hit preview as shown below,
Google rich snippets tool results
You will notice Verified: Authorship markup is verified for this page and that shows you have successfully implemented this feature for your blog.
Note:: It wil take some 48 hours for this options to work, so please wait.
Please use comments box to ask anything if not cleared and share your valuable thoughts.

EARN MONEY INFOLINKS ADVERTISING


how can earn with infolinksHow do i get money from infolinks
Infolinks is an in text advertising network that serves pay per click ads on a publisher blog/website.  It is one of the best ads network after google adsense for making money online especially for bloggers who do not have extra space to displays ads and difficult to get AdSense.
How can I earn money? You can see on this page many double underline words which are basically infolinks ads.When you take cursor on these words,a small window appears or percolate to give any information to click.If any user clicks those infolink text ads then I earn money online from those textual ads.Infolinks itself decides and selects where to put its textual ads on webpages.

Infolinks membership / registration is free for all .

Here’s a step-by-step tutorial on how to create infolinks account
1. Create an account by visiting this link. Now, you can also use your Facebook credentials when creating your Infolinks account.
infolinks form fill
2. After fill forum click join and get code for your site or blog copy code and past into your site
3. your site will be approval wtithen 48 hours. Ads will automatically begin run after approval.
4. Once you created your account, log on to your admin panel by clicking on Login > Publisher on their homepage.
5. After you login successfully, you will be brought to the Publishers Center. Here you can check your dashboard and notifications. You can also view your report from a specified date or since the last payout. It also contains the links to different settings such as Integrate, Customize, Account and New.

Infolinks, very customizable for you.

Infolinks provides you various tools for in text ads for earning money online .Use all the tools so that you get maximum chances of getting money whenever any visitor lands on your webpages.You can aslo use related tags ,tag cloud and search widget on your website to earn money.

How Much People Earn From Infolinks?

Some people earns several dollars from Infolinks, from $50 to $100 every month. But based from their FAQs, there is no limit on how much you can earn from them – sky is the limit. What you just need is a high traffic website and the correct way of putting their codes which we discussed above.

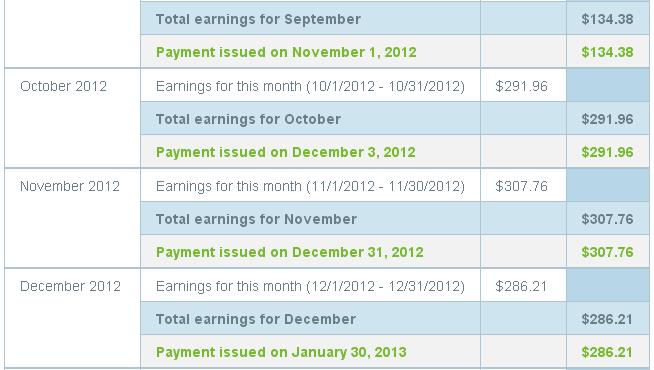
My earning statement:

My earning statement:

Infolinks payout

Infolinks has minimum payout of 50 $ for publishers .Once infolinks ads are integrated into your website,then you start earning money online and money is accomulated into your account.Once your earning reach 50$ then you can order for payment.Infolinks pays through paypal,wire transferor payoneer.
Full Support About infolinks Click Here
Start earning from infolinks now.

MAKE MONEY GOOGLE ADSENSE

                  Google adsense is the best and big adsense company in the world..

 
Blogger provides a simple way for you to make money with your blog. AdSense is Google's content- targeted advertising program. If you use AdSense, you don't have to select keywords or categories for your ads. Instead, Google's servers determine what your posts are about and display the most relevant ads to your readers. For example, if you blog about , you might see ads for “Baseball” next to your post. If you blog about painting, you might see ads for “Art Supplies.”
SIGN UP FOR ADSENSE

Starting a new account with Google AdSense is one of the easiest ways to start monetizing your blog. While Google AdSense might not make you rich, it's a simple and useful tool. In fact, it's usually the first step bloggers typically take to earn an income from their blogs because it is so easy to get started.

Please Follow instructions below:

1. Read the Google AdSense program policies.

2. Visit the Google AdSense home page.
Click on the 'Sign Up Now' button in the upper righthand corner of your screen.

3. Complete the online application.
You will need to provide your blog's URL and primary language as well as answer some questions related to the rules of the Google AdSense program. You'll also need to provide your payment information to receive the money you generate on your blog from Google.

4. Access your new account and review the ads available to you.
Google AdSense provides a Broad range of advertising options to bloggers from text ads to image ads and more. Take some time to research everything that's available to Assessment what will work best for your blog.

5. Select your ad design choices.
Once you've decided which ad opportunities are best for your blog, select them. Google will provide a snippet of HTML code to you after you make your selection.

6. Insert your Google AdSense HTML code into your blog.
Copy and paste the HTML code provided by Google into your blog's template. One of the easiest ways for a beginner blogger to do this is by inserting a text widget into his or her blog's template and pasting the code in the widget.

7. Let Google do the rest.
It may take a few hours or a few days for Google to start serving ads on your blog. Google will search your blog to determine the predominant subjects of each page. When readers visit your blog, the HTML code you pasted into your blog from Google will activate and relevant ads will be displayed based on each page's content.

8. Collect your money.
Intro to Adsense Payment
Remember, Google AdSense typically pays based on click-throughs (the number of times people click on an ad). Therefore, Google AdSense is unlikely to generate a large income for you, but every bit helps!

This Topic available on Google Support Beginner's guide

Tips:
  • Read and adhere to the Google AdSense policies in full before you sign up for a Google AdSense account. If you violate any of the policies, your account will be cancelled.
  • Take some time to perfect your Google AdSense program once you get started by learning the steps you need to take to increase your Google AdSense earning potential.

Online Earn Money With Chitika and Blogger

Chitika is a PPC program with high rate oF payment is a free service that displays revenue-earning ads to your web site or blog visitors that includes different types of ads for different types of traffic. it's very the same as Google AdSense but it is a bit different so the best news is that you can have both on the site at the same time. Google AdSense and Chitika can work friendly and do not violate Terms of Use of each service.


Chitika is that the only ad-network that knows when not to show an ad, helping to protect your user expertise.
Apply to be a Chitika Publisher!

Why Use Chitika?

Because chitika is the best way to build cash on-line along the Google AdSense. Chitika can show relevant ads at the right time. several bloggers use Chitika to monetize their blogs and sites and Darren Rowse (from ProBlogger) extremely suggest this service to make money online.


Very Low Minimum Payout

Chitika charges advertisers to be featured aboard your site's content. At the end of each month you're paid supported the previous month's earnings (Net 30). Payments are sent once your account earns a minimum of $10.00 (USD) for PayPal payouts or $50.00 (USD) for checks.

Chitika Referral Program


Never forget to use the Chitika Referral Program, which gives you a share from the publishers and advertisers you refer. This becomes an excellent income if you're able to refer others to join this program. 20% of my chitika earnings ar referral earnings that keeps on going although i'm not using Chitika on my blogs.
Multiple Sizes of Ad Units There are different sizes of ad units available


Applying for a Chitika Account.

EASILY EARN MONEY ADSENSE.

EASILY EARN MONEY ADSENSE.................


If you don’t have an Adsense account and Google Adsense not approved your account than Yahoo Bing contextual ads network is that the best alternatives for your web site to earn cash from advertising. Yahoo and Bing have signed a contract with media.net to give contextual ads for those websites who provide advertising on their sites. 
Yahoo - the internet company that has its hands on almost any business on the net.) has closed down its publisher network (e.g. yahoo adsense program) in 2010. In Sep 2012, Yahoo declared its partnership with Media.net (the advertising company that manage and operate the Yahoo Bing contextual Advertising program.) to relaunch its publisher network which can be known as Yahoo! Bing Network (YBN) contextual Ads.(online ad network)


Yahoo! Bing Network Contextual Ads Program

Why you should select Yahoo! Bing contextual Ads Program

  • Keyword Based High Paying Ads
  • Create your Own Advertising Units just like Google Adsense
  • Don’t Have enough Time to Manage your Ads, Put your Advertising Unit on Autopilot Mode
  • Support for Mobile Based Advertisements
  • Use Real Time Website Tracker to Analyze the Performance of your Ads in your Website/Blog

How to Apply for Yahoo! Bing Contextual Ads Program

  1. Anyone can easily Apply for YAHOO! BING Contextual Ads Program and it's very simple further.
  2. visit http://www.media.net Simply click on “Request an Invite” button which appears in Upper Right corner.
  3. Now you will see the Filling Registration Form for Yahoo! Bing Ads, you may need to fill in your personal detials in this form.fill your Name and other details such as your Permanent Address, City and other fields.
  4. You have filled all your details so at last you will see a confirmation message which will appear like shown below along with a message. Let’s see what it says:
Important Note : Due to the extremely high volume of interest that we have received, we currently have a backlog, and hence it may take us up to 2 weeks to get back to you on the status of your invitation request.

It might take more than two weeks to review your application whether or not to approve or disapprove.So show patience till you receive an approval or being rejected email.You can ready to submit upto five Blogs/Websites for review.So let us know what you think about Media.Net in the comment below.

Yahoo Bing Ads Payout Methods

They give you two payment options Paypal and Wire Transfer. The minimum payout threshold is $100 and it's very simple to achieve if you have got an honest traffic.

HOW TO SETUP BLOGGER TEMPLATES..

If you want to use customize blogger Templates Follow the step and install a blogger templates in blogger.


Download your new blogger template to your computer. If the template is contained in a zip file, ensure you have extracted the XML template.
Note:  Upload only xml file for blogger templates
  1. Login to your blogger account
  2. Now just select Template and you can see bellow button at the right hand side.
  3. Now just click on backup / restore button and one box will pop up (you can see it in bellow snapshot)
  4. Now simply browse your template and click on upload and you have done !


install blogger template