Showing posts with label BLOGGER. Show all posts

Numbered Page Navigation For Blogger New Script


Today we will see how to add a nice page number navigation hack blogger. The default navigation links (i.e Older Posts) is not the friendly visitor if you are having a lot of jobs and bloggers readers.Few has some problems with the above script navigation page. Now here is a completely new script and work for numbered page navigation (i.e. Panigation) for Blogger. The paging widget for blogger it easy for the visitor. It is a must have for any new blogs.This new script allows you to add numbered page navigation to blogger/ blogspot blog with page numbers starting(1, 2, 3, 4 ….) like those of a book.

Numbered Page Navigation

Add Numbered Page Navigation Widget With DIfferent Styles For Blogger / Blogspot


Page navigation widget for blogger is most popular widget, and most bloggers are using this. because these players are only provided in the wordpress blogs hosted or blogs.But now his trick has been made ​​available to bloggers is also here that I am giving this Page Navigation Widget with different styles and options for full customization


How To Install This Widget On Blogger :-

Customize the Given Options and Click on Generate button
Click Add to Blogger button to add this widget on your Blog


Stylish Numbered Page Navigation Widget with Colored Styles For Blogger


Numbered Page Navigation Widget is a JavaScript hack for blogger to easily navigate blogger pages. In this post i am giving stylish navigation with different colorful styles.

An error was found in some blogs and it is also fixed in this widget.
eg.hiding at top


How To Install This Widget On Blogger :-


  1. Click the below Button
  2. Customize the Options given in Widget form
  3. Click on "Generate" Button
  4. Finally click On "Add To Blogger" Button


How to Add Numbered Page Navigation Widget for Blogger / Blogspot


Page navigation is awesome widget that allows navigation of page number to the visitors. You might have seen numbered page navigation in many WordPress blogs. It is simple JavaScript that allows your older posts, new posts and links to the house numbers. Have you seen older posts, new messages and links at home bored.


How To Add Numbered Page Navigation Widget to Blogger Blog?

I am giving best customizing options to this widget

Note:-Choose colors for your convenience you feel good.

1.Customize Options in Widget Form
2.Click on Generate Button
3.Then finally Click on Add to Blogger Button to add as a Widget


BLOGGER PAGE NAVIGATION WIDGET WITH DIFFERENT STYLES


How To Install This Widget On Blogger :-

Customize the Given Options and Click on Generate button
Click Add to Blogger button to add this widget on your Blog


UPDATED


Change based on your blog setting :
var postperpage=5;
var numshowpage=3;

Postperpage : How many Post every Page for your blog
numshowpage : how Many number will show in Your page Navigation

Customize Label (if you already use my previous Page Navi don’t use this step)

Go to the Edit HTML page and “Expand Widget Templates”
Find this (all of this text in your xml or template)

'data:label.url'


and Replace with this

'data:label.url + "?&max-results=5"'


Change 5 base on how many post every page

Recent Comment Widgets


আসসালামুয়ালাইকুম,আজকে আমি আপনাদের দিব দুইটি Recent Comment Widgets । আশা করি ভালো লাগবে।

১) আপনার ব্লগার ব্লগ লগ অন করুন তারপর ড্যাশবোর্ড থেকে Layout এ ক্লিক করুন তারপর Add a Gadget এ ক্লিক করুন । নীচের চিত্রে দেখুন । 


২) এবার যে বক্স ওপেন হবে সেখান থেকে HTML/JavaScript এ ক্লিক করুন । নীচের চিত্রে দেখুন । 

৩) এবার একটি বক্স ওপেন হবে সেখানে Title ঘর ফাকা রেখে Content ঘরে নিচের যেটি পছন্দ সেই কোডটি কপি করে পেস্ট করুন । নীচের চিত্রে দেখুন । 


Widget পছন্দ করুন


***কোড (০১নং Widget) ***
<style type="text/css">
ul.bh_recent_comments {
    list-style: none;
    margin: 0;
    padding: 0;
}
.bh_recent_comments li {
    background: none!important;
    margin: 5px!important;
    padding: 5px!important;
    display: block;
    clear: both;
    overflow: hidden;
    list-style: none;
}
.bh_recent_comments li .avatarImage {
    padding: 3px;
    background: #fefefe;
    -webkit-box-shadow: 0 1px 1px #ccc;
    -moz-box-shadow: 0 1px 1px #ccc;
    box-shadow: 0 1px 1px #ccc;
    float: left;
    margin: 0 6px 0 0;
    position: relative;
    overflow: hidden;
}
.avatarRound {
    -webkit-border-radius: 100px;
    -moz-border-radius: 100px;
    border-radius: 100px;
}
.bh_recent_comments li img {
    padding: 0;
    position: relative;
    overflow: hidden;
    display: block;
}
.bh_recent_comments li span {
    margin-top: 3px;
    color: #666;
    display: block;
    font-size: 12px;
    line-height: 1.4;
}
.bh_recent_comments li {
    -webkit-transition: .5s;
    -moz-transition: .5s;
    -ms-transition: .5s;
    -o-transition: .5s;
    transition: .5s;
}
.bh_recent_comments li:hover {
    background: #FD7474 !important;
    border-radius: 100%;
}
.bh_recent_comments li {
    -webkit-transition: .5s;
    -moz-transition: .5s;
    -ms-transition: .5s;
    -o-transition: .5s;
    transition: .5s;
    border: 2px solid transparent;
}
.bh_recent_comments li:hover {
    -webkit-transform: scale(1.2) translate(15px);
    -moz-transform: scale(1.2) translate(15px);
    -ms-transform: scale(1.2) translate(15px);
    -o-transform: scale(1.2) translate(15px);
    transform: scale(1.2) translate(15px);
    box-shadow: 0 0 20px 1px #aaa;
}
</style>
<script type="text/javascript">
//<![CDATA[
    // Recent Comments Settings
    var
 numComments  = 5,
 showAvatar  = true,
 avatarSize  = 45,
 roundAvatar = true,
 characters  = 40,
 showMorelink = false,
 moreLinktext = "More ?",
 defaultAvatar  = "https://blogger.googleusercontent.com/img/b/R29vZ2xl/AVvXsEiUOCoCdGlZZwvy6Viu9IBy27K8ExLQcSnT1rz2FVUUYyB-cfZM3Qg-zypFPfjL5CebH1qhLSVVO65PHlmjL_RKZgc4if19qxYJW4a4RphjOPM_YTPOpJRx6WTQIzX1nt-cUvwW7VDONVR3/s1600/blogger-avatar-1.png",
 hideCredits = true;
//]]>
</script>
<script type="text/javascript" src="http://dl.dropbox.com/u/81212926/bloggerheroe-recent%3Dcomments.js"></script>
<script type="text/javascript" src="/feeds/comments/default?alt=json&callback=bh_recent_comments&max-results=5"></script>
**কোড(২ নং Widget)**
<style type="text/css">
    ul.bh_recent_comments{list-style:none;margin:0;padding-bottom:5px;}
    .bh_recent_comments li{margin:0px 0px 0px 0px;
border-bottom:1px dotted pink;
 display:block;
 clear:both;
 overflow:hidden;
}
    .bh_recent_comments li .avatarImage{-webkit-border-radius:100px ;
 -moz-border-radius:100px ;
 border-radius:100px ;
 padding:3px;
 background: cyan;
 -webkit-box-shadow:0 1px 1px #333;
 -moz-box-shadow:0 1px 1px #333;
 box-shadow:0 1px 1px #333;
 float:left;
 margin:6px 6px 6px 0;
 position:relative;
 overflow:hidden;
img filter:alpha(opacity=50);
-moz-opacity: 0.5;
opacity: 0.5;
-khtml-opacity: 0.5;
}
 .bh_recent_comments li .avatarImage:hover{-webkit-border-radius:100px ;
 -moz-border-radius:100px ;
 border-radius:100px ;
 padding:3px;
 background: pink;
 -webkit-box-shadow:0 1px 1px #333;
 -moz-box-shadow:0 1px 1px #333;
 box-shadow:0 1px 1px #333;
 float:left;
 margin:6px 6px 6px 0;
 position:relative;
 overflow:hidden;
img filter:alpha(opacity=100);
-moz-opacity: 1.0;
opacity: 1.0;
-khtml-opacity: 1.0;
}
    .avatarRound{-webkit-border-radius:100px;-moz-border-radius:100px;border-radius:100px;}
    .bh_recent_comments li img{-webkit-border-radius:100px;
 -moz-border-radius:100px;
 border-radius:100px;
 padding:0px;
 position:relative;
 overflow:true;
 display:block;
}
    .bh_recent_comments li span{color: #FFFFFF;
 display: block;
 font-size: 11px;
 font-style: italic;
 line-height: 1.4;
}
.commentNavi {
 clear: both;
 padding: 5px 0;
 display:inline-block;
 width:100%;
}
.commentNavi a, .commentNavi span.current {
 font-size:11px !important;
}
</style>
<script type="text/javascript">
//<![CDATA[
    // Recent Comments Settings
    var
 numComments  = 7,
 showAvatar  = true,
 avatarSize  = 40,
 roundAvatar = true,
 characters  = 50,
 defaultAvatar  = "http://www.gravatar.com/avatar/?d=mm",
 hideCredits = true;
//]]>
</script>
<script type="text/javascript" src="http://dl.dropbox.com/u/81212926/bloggerheroe-recent%3Dcomments.js"></script>
<script type="text/javascript" src="/feeds/comments/default?alt=json&callback=bh_recent_comments&max-results=4"></script>

COMMENT STYLE


আজ আমি আপনাদের দেখাব ব্লগে কিভাবে কমেন্তকারির নাম এর সাথে তার ছবির জায়গা করে দিতে হবে,  আমি আপনাদের জন্য তিনটি Style দিয়ে দিয়েছি আপনাদের যেইটা ভাল লাগে আপনারা ওইটাই যুক্ত করে নিন

কাজ শুরু করা যাক,
প্রথমে ব্লগারে জান

এইবার Template থেকে Edit html এ ক্লিক করুন
এখন আপনার কীবোর্ড এর Ctrl+F প্রেস করে ]]></b:skin>  Search করুন
এইবার নিচের যেই কোন একটি কোড ]]></b:skin>  এর সামনে Copy করে paste করে দিন

Style#1
.sg_recent_comments li {
    -webkit-transition: .5s;
    -moz-transition: .5s;
    -ms-transition: .5s;
    -o-transition: .5s;
    transition: .5s;
    border: 2px solid transparent;
}
.sg_recent_comments li:hover {
    -webkit-transform: scale(1.2) translate(15px);
    -moz-transform: scale(1.2) translate(15px);
    -ms-transform: scale(1.2) translate(15px);
    -o-transform: scale(1.2) translate(15px);
    transform: scale(1.2) translate(15px);
    box-shadow: 0 0 20px 1px #aaa;
}

Style#2 
.sg_recent_comments li {
    -webkit-transition: .5s;
    -moz-transition: .5s;
    -ms-transition: .5s;
    -o-transition: .5s;
    transition: .5s;
}
.sg_recent_comments li:hover {
    background: #C9FD7A !important;
    border-radius: 100%;
}

Style#3 
.sg_recent_comments li {
    -webkit-transition: .5s;
    -moz-transition: .5s;
    -ms-transition: .5s;
    -o-transition: .5s;
    transition: .5s;
    border: 2px solid transparent;
}
.sg_recent_comments li:hover {
    border: 2px Solid red;
}

আশা করি আপনাদের কাছে ভাল লেগেছে

DO YOU COPY BLOG POST??? READ THE POST


আমরা সবাই মোটামুটি গুগলের পান্ডা এবং পেঙ্গুইন এর হাতে লাথি উস্টা খাই। এখন এমন হয়ে গিয়েছে মনে হয় সয়ে গিয়েছে। যারা ব্লগিং করে টাকা আয় করছেন তারা এই বিষয় টা খুব ভাল জানেন এবং যারা করবেন তাদের জন্য জরুরি আমার নিচের লেখাটা।

কপিরাইটিং করলে কি ক্ষতিঃ

এই কপিরাইটিং বিষয় সম্পর্কে মোটামুটি সবাই জানি। কপি পেস্ট করা গুগল মোটেও পছন্দ করে না। আপনি যদি এই ধরনের কাজ করে থাকেন গুগলে আপনাকে ঘাড় ধাক্কা দিয়ে বের করে দিবে। এখন এই বিষয় সবাই সচেতন। যে যা পারে তাই লেখে, যাতে কপি পেস্ট না হয় তাই।
google post index

কিছু সোশ্যাল শেয়ারিং সাইটের লিঙ্ক শেয়ার করলাম।


আপনি জানেন কি?

আপনার লেখা চুরি করার জন্য ২৪ ঘন্টা চোখে চোখে রাখের কিছু চোর লেখক। অভাক হচ্ছেন তাই তো। কিছু চোর আছে যাদের আর্টিকেল লেখার সময় নেই তারা আপনার লেখা চুরি করে তার সাইটে দেয়। আপনি যখন একটা পোষ্ট দেন। পোস্ট সাথে সাথে গুগলে ইনডেক্স হয় না। এটা আমরা সবাই জানি। কিন্তু আপনার সাইট এর পোস্ট গুগলে ইনডেক্স হওয়ার আগে যদি কেউ আপনার নতুন লেখা টা তার সাইটে নিয়ে পোষ্ট করে আপনার আগে গুগলে ইনডেক্স করিয়ে বসে এতে বাঁশটা কে খাবে। আপনি না সে? হ্যাঁ আপনি খাবেন। তখন গুগল আপনার সাইটের সেই নতুন লেখাকে কপি পেস্ট আওতায় ফেলে দিবে।
এখন তো চিন্তায় পরে গেলেন এত তারতারি কি করে ইনডেক্স করাবেন তাই না।
পোষ্ট টা এমন একটা সময় দিবেন যখন আপনি আগামি ১ ঘন্টা পুরো ফ্রী। তারাহুড়া করবেন না।

  • লেখা শেষ করে সাথে সাথে সাইটম্যাপ করে ফেলুন
  • সাইট ম্যাপ করার পর টুইটার, গুগল প্লাস এবং পিংরেস্ট এ শেয়ার করে ফেলুন।
  • তারপর এই দুইটি সাইটে সাবমিট করুন -    http://www.google.com/addurl          এবং            http://blogsearch.google.com/ping
  • তারপর https://pingler.com/      এবং        pingomatic.com.
  • এগুলো শেষ করে ফেলুন ২ থেকে ৩ মিনিট এর মধ্যে।
  • শেষ করার পর আপনার নতুন পোষ্ট এর লিঙ্কটাঃ উদাহরণঃ http://www.yourdomain.com/my-new-domain/ এভাবে কপি করে নিয়ে গুগল সার্চ বক্সে দিন এবং তখন যদি দেখতে পারেন আপনার আপনার সাইটের নতুন পোষ্ট টা গুগলে ইনডেক্স হয় গিয়েছে। তাহলে নিশ্চন্তে সোশ্যাল শেয়ারিং শুরু করে দেন।


HOW TO SETUP BLOGGER TEMPLATES..

If you want to use customize blogger Templates Follow the step and install a blogger templates in blogger.


Download your new blogger template to your computer. If the template is contained in a zip file, ensure you have extracted the XML template.
Note:  Upload only xml file for blogger templates
  1. Login to your blogger account
  2. Now just select Template and you can see bellow button at the right hand side.
  3. Now just click on backup / restore button and one box will pop up (you can see it in bellow snapshot)
  4. Now simply browse your template and click on upload and you have done !


install blogger template

BLOGGER CREATE NEW POST AND PUBLISHED

                             BLOGGER CREATE NEW POST AND PUBLISHED


Google present  free blog site and easily domain system....
Once you have logged into Blogger you'll see your Dashboard. create a new post for blogger.


new post for blogger.com

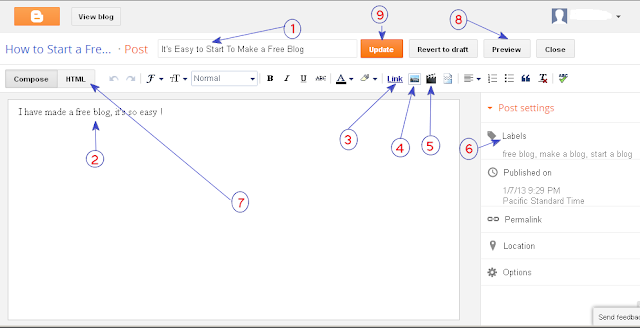
You come to the post editor, from here, you can create your first post with text, music, videos inside.

new blog post guide

  1. Your post title
  2. Your post content
  3. Add a link to another webpage
  4. Add a photo to the post
  5. Add a video to teh post
  6. Add a label (Category) to your post
  7. Swith to HTML mode, to add HTML or JavaScript codes directly into the post
When you're done, click the gray Preview button at the top to make sure it's ready to go. This will open a new tab in your browser where you can see what your post looks like on your blog. You can go back to the previous tab and edit your post further, or, if you're satisfied, just click Publish to publish your post. That's all there is to it!!!!!!!!!!!!!!!!!!!!!!!

HOW TO CREATE E BLOGGER ACCOUNT


Follow the instruction given below to make your own blog for free and enjoy your blogging life..

Step1. Go to Blogger.com and Sign In using your Gmail/Google Account. if you don't have a google account then please first create google account and blogger account.

1. Create Google Account
2. Create Blogger Account

After sign in when you see below screen, click on New Blog button at the left to start to create a new blog.

new blogger account

Step 2. Create a new Blog title and url address
how to create new blogger site
Type in your Blog Title and the blog address you'd like to use, then choose a blog template.

  • If enter you domain side shows "Sorry, this blog address is not available"- that means, the address is used by someone, so you have to pick another address.
  • You can pick any template at this moment, and change it later
  • When blog title and address is Ok, click on Create Blog ! button at the bottom of the page.